leveldb 的缓存结构
LevelDB 缓存实现解析:LRU 算法在 Key-Value 数据库中的应用与优化
redis 的代码清晰不卖弄,也有很详细的注释,如果已经开始阅读代码,这篇不算详细的文章是多余的。但是,如果你拿到了一份代码但不知道何处入手,也许阅读代码时参考本文是个不错的选择。
可以使用下面的命令得到本文对应的代码:
git clone git@github.com:antirez/redis.git
git checkout 4.0
当多个线程同时访问一个内存空间而没有规定顺序,并且其中一个以上的访问是写操作,则会引发一种叫"竞争条件" (race condition) 的问题。
例如增加一个变量的值,共包含三个步骤
read value
increase value
write back
当两个线程都包含这个操作,并且没有任何并发控制,则可能出现两种情况。
value 初始值为 1,如果一切顺利,两个线程一共将变量 value 增加两次,最后 value 的值应该是 3。
| thread1 | thread2 | value |
|---|---|---|
| readvalue = 1 | 1 | |
| increase value = 2 | 1 | |
| write back | 2 | |
| readvalue = 2 | 2 | |
| increase value = 3 | 2 | |
| write back | 3 |
如果两个线程都 readvalue 之后,线程 1 增加变量的值,并将其增加后的值 (2) 写回内存;之后线程 2 增加变量的值,并将增加后的值 (2) 写回内存,则最后 value 的值为 2。
| thread1 | thread2 | value |
|---|---|---|
| readvalue = 1 | 1 | |
| readvalue=1 | 1 | |
| increase value = 2 | 1 | |
| write back | 2 | |
| increase value = 2 | 2 | |
| write back | 2 |
value 的值不能确定,这种不确定将导致程序的错误。为了处理竞争的情况,可以使用互斥锁来作并发控制,与原子操作相比,需要消耗一些性能,因此一般使用原子操作对一个共享变量进行并发控制。
这是原子操作默认的模式,这种模式非常严格,也非常容易理解。例如:假设 x 和 y 初始值为 0 。
| thread1 | thread2 |
|---|---|
| y=1 | if (x.load() == 2) |
| x.store(2) | assert (y==1) |
虽然 x 和 y 没有数据依赖,这个模式依然令 assert 条件不会失败。 y 的写操作永远在 x.store() 之前。线程 2 如果感知到了 x.store(2) ,那么线程
1 中所有这条语句之前的操作都能被 2 感知到。这意味着优化器不能重排
thread1 的指令使得 x.store(2) 之前的语句在 x.store(2) 之后执行。
这是相对宽松的模式,没有规定任何顺序,仅仅保证一个变量的访问是原子操作,编译器可以改变指令顺序以达到优化目的。下面两个 assert 条件都可能失败。
-Thread 1-
y.store (20, memory_order_relaxed)
x.store (10, memory_order_relaxed)

-Thread 2-
if (x.load (memory_order_relaxed) == 10)
  {
  assert (y.load(memory_order_relaxed) == 20) /* assert A */
  y.store (10, memory_order_relaxed)
  }

-Thread 3-
if (y.load (memory_order_relaxed) == 10)
  assert (x.load(memory_order_relaxed) == 10) /* assert B */
这是介于以上两者之间的模式,只规定了有依赖的变量的顺序访问。
read-acquire 表示任何之后的内存操作都不会重排到这之前, write-release
表示任何之前的内存操作都不会重排到这之后。如果一个线程 a 使用
memory_order_release store 一个变量,并且另一个线程 b 通过
memory_order_acquire load 读取这个变量,那么线程 b 将能感知到
memory_order_release store 之前的任何写操作。
下面的例子中,任何一个 assert 条件都可能为真
-Thread 1-
y.store (20, memory_order_release);

-Thread 2-
x.store (10, memory_order_release);

-Thread 3-
assert (y.load (memory_order_acquire) == 20 && x.load (memory_order_acquire) == 0)

-Thread 4-
assert (y.load (memory_order_acquire) == 0 && x.load (memory_order_acquire) == 10)
如果使用 Sequentially Consistent,那么只有一个 assert 条件为真。
不同的环境提供的原子操作函数是不一样的,为了在不同环境下使用原子操作,
redis 在 atomicvar.h 中对原子操作作了封装。封装之后有5个原子操作函数,分别是
atomicIncr(var,count) -- Increment the atomic counter
atomicGetIncr(var,oldvalue_var,count) -- Get and increment the atomic counter
atomicDecr(var,count) -- Decrement the atomic counter
atomicGet(var,dstvar) -- Fetch the atomic counter value
atomicSet(var,value)  -- Set the atomic counter value
准确的说这些操作都是宏而不是函数,虽然导致最后生成的代码可能比真正的函数多一些,但现实中使用起来这些区别几乎是可以忽略的。因为不是真正的函数,而是宏,参数不需要是地址,直接把变量名直接传入即可。需要注意的是,这些函数的返回值的意义是不确定的,所以千万不要使用它们的返回值,否则可能引发"在我的电脑上是好的"这样的争论。
这个文件会判断使用哪种类型的原子操作 —— __atomic 或者 __sync ,如果两者都不可用,就通过 libpthread 提供的互斥锁实现。具体判断逻辑在
config.h 中。在不同的环境中,编译器编译时会预先定义一系列宏,例如,我们可以通过 #ifdef(__APPLE__) 判断是否在 apple 的操作系统上编译。
config.h 就是利用这些预定义的宏来判断处于哪个版本的哪种环境。
因为在没有原子操作的环境中要使用互斥锁,所以在声明一个原子变量时要同时声明一个互斥锁,互斥锁的命名必须是变量名后边加上 _mutex :
long myvar;
pthread_mutex_t myvar_mutex;
atomicSet(myvar,12345);
Helgrind 是个很出色的测试工具,但不能识别 __atomic 原子操作,只能识别
__sync 。如果要使用 Helgrind,可以暂时强制使用 __sync 原子操作代替,要做到这一点,只需要在上面提到的 5 个原子操作之前插入下面一行:
#define __ATOMIC_VAR_FORCE_SYNC_MACROS
这在某些环境中是不安全的,记得测试结束要把这句话删除。
__atomic 实现原子操作
首先判断应该使用 __atomic , __sync 还是 pthread mutex
#if !defined(__ATOMIC_VAR_FORCE_SYNC_MACROS) && defined(__ATOMIC_RELAXED) && !defined(__sun) && (!defined(__clang__) || !defined(__APPLE__) || __apple_build_version__ > 4210057)
  // use __atomic ...
#elif defined(HAVE_ATOMIC)
  // use __sync ...
#else
  // use pthread mutex ...
#endif
__ATOMIC_VAR_FORCE_SYNC_MACROS 是为了强行规定使用 __sync 以使让
Heigrind 不再抱怨的临时措施;而 HAVE_ATOMIC 的定义写在 config.h 里:
#if (__i386 || __amd64 || __powerpc__) && __GNUC__
 #define GNUC_VERSION (__GNUC__ * 10000 + __GNUC_MINOR__ * 100 + __GNUC_PATCHLEVEL__)
 #if defined(__clang__)
  #define HAVE_ATOMIC
 #endif
 #if (defined(__GLIBC__) && defined(__GLIBC_PREREQ))
  #if (GNUC_VERSION >= 40100 && __GLIBC_PREREQ(2, 6))
  #define HAVE_ATOMIC
  #endif
 #endif
#endif
接着,在判断使用 __atomic 的地方用相关内置函数实现:
#define atomicIncr(var,count) __atomic_add_fetch(&var,(count),__ATOMIC_RELAXED)
#define atomicGetIncr(var,oldvalue_var,count) do { \
  oldvalue_var = __atomic_fetch_add(&var,(count),__ATOMIC_RELAXED); \
} while(0)
#define atomicDecr(var,count) __atomic_sub_fetch(&var,(count),__ATOMIC_RELAXED)
#define atomicGet(var,dstvar) do { \
  dstvar = __atomic_load_n(&var,__ATOMIC_RELAXED); \
} while(0)
#define atomicSet(var,value) __atomic_store_n(&var,value,__ATOMIC_RELAXED)
#define REDIS_ATOMIC_API "atomic-builtin"
__ATOMIC_RELAXED 就是上面提到的 Relaxed 模式。 do {...} while (0) 的作用是在宏中将多条语句合成为一条。例如下面的代码中,如果多条语句的宏没有使用 do {...} while (0) ,将会出现分支语句失效的情况。
#define ASIGN_TOTAL(a, b, c) \
  val1 = a;  \
  val2 = b;  \
  val3 = c;
// ...

if (condition)
  ASIGN_TOTAL(10, 20, 30);

/*
 *上面的代码将被预处理器扩展成
 *  if (condition)
 *  val1 = 10;
 *  val2 = 20;
 *  val3 = 30;
 * val2 和 val3 都在分支条件之外,这显然不是代码的意图。
 */
如果需要了解更多关于 __atomic 的知识,可以参考 GCC 的文档。
__sync 实现原子操作
如果没有 __atomic ,则尝试使用古老的 __sync :
#define atomicIncr(var,count) __sync_add_and_fetch(&var,(count))
#define atomicGetIncr(var,oldvalue_var,count) do { \
  oldvalue_var = __sync_fetch_and_add(&var,(count)); \
} while(0)
#define atomicDecr(var,count) __sync_sub_and_fetch(&var,(count))
#define atomicGet(var,dstvar) do { \
  dstvar = __sync_sub_and_fetch(&var,0); \
} while(0)
#define atomicSet(var,value) do { \
  while(!__sync_bool_compare_and_swap(&var,var,value)); \
} while(0)
#define REDIS_ATOMIC_API "sync-builtin"
如果环境没有提供原子操作,则只能使用互斥锁:
#define atomicIncr(var,count) do { \
  pthread_mutex_lock(&var ## _mutex); \
  var += (count); \
  pthread_mutex_unlock(&var ## _mutex); \
} while(0)
#define atomicGetIncr(var,oldvalue_var,count) do { \
  pthread_mutex_lock(&var ## _mutex); \
  oldvalue_var = var; \
  var += (count); \
  pthread_mutex_unlock(&var ## _mutex); \
} while(0)
#define atomicDecr(var,count) do { \
  pthread_mutex_lock(&var ## _mutex); \
  var -= (count); \
  pthread_mutex_unlock(&var ## _mutex); \
} while(0)
#define atomicGet(var,dstvar) do { \
  pthread_mutex_lock(&var ## _mutex); \
  dstvar = var; \
  pthread_mutex_unlock(&var ## _mutex); \
} while(0)
#define atomicSet(var,value) do { \
  pthread_mutex_lock(&var ## _mutex); \
  var = value; \
  pthread_mutex_unlock(&var ## _mutex); \
} while(0)
#define REDIS_ATOMIC_API "pthread-mutex"
性能会有写降低,也是无奈之举。
redis 使用一个事件循环来处理异步任务。能处理的事件分为两种:一种是定时任务,指定的时间到达时调用;另一种是基于文件描述符的任务,当文件描述符可读或可写时执行相应的函数。
ae.h 中声明了事件处理相关的大部分数据结构。首先是回调函数的类型:
/*
 * 文件描述符事件的回调函数,当对应的文件描述符可读或可写时调用
 */
typedef void aeFileProc(struct aeEventLoop *eventLoop, int fd, void *clientData, int mask);
/*
 * 定时任务回调函数,当设定的时间到达时调用
 * 返回值如果为 AE_NOMORE,则执行后将任务从链表中删除,否则继续在下一个时间循环中执行
 */
typedef int aeTimeProc(struct aeEventLoop *eventLoop, long long id, void *clientData);

/*
 * 定时任务最后一次执行后将执行这种回调函数
 */
typedef void aeEventFinalizerProc(struct aeEventLoop *eventLoop, void *clientData);

/*
 * 如果要指定时间循环等待之前或之后需要执行的任务,则使用这种回调函数
 */
typedef void aeBeforeSleepProc(struct aeEventLoop *eventLoop);
基于文件描述符的事件结构包含一个标志位,表示文件可读或者可写;如果设定文件描述符可读时触发,则指定 rfileProc 回调函数,如果设定文件描述符可写时触发,则要指定 wfileProc ; clientData 是用户可以使用的字段,可以指向任何数据。
/* File event structure */
typedef struct aeFileEvent {
  int mask; /* one of AE_(READABLE|WRITABLE) */
  aeFileProc *rfileProc;
  aeFileProc *wfileProc;
  void *clientData;
} aeFileEvent;
定时任务的结构包含一个标识符 id ,表示何时触发的时间 when_sec,when_ms
,触发时调用的函数 timeProc ,最后一次触发后调用的函数 finalizerProc
,用户数据 clientData ,以及指向下一个时间事件的指针 next 。
/* Time event structure */
typedef struct aeTimeEvent {
  long long id; /* time event identifier. */
  long when_sec; /* seconds */
  long when_ms; /* milliseconds */
  aeTimeProc *timeProc;
  aeEventFinalizerProc *finalizerProc;
  void *clientData;
  struct aeTimeEvent *next;
} aeTimeEvent;
当基于文件描述符的任务触发时,将准备一个 aeFiredEvent 数组,将描述符
fd 和 mask 放入其中。可以通过 fd 找到对应的 aeFileEvent 。
/* A fired event */
typedef struct aeFiredEvent {
  int fd;
  int mask;
} aeFiredEvent;
整个事件处理结构包含了需要的所有数据。 maxfd 是注册过的最大文件描述符, setsize 表示目前可以容纳的文件描述符事件的最大数量,
timeEventNextId 表示下一个定时事件 id 的取值, lastTime 记录上次处理定时事件的时间, events 是容纳文件描述符任务的数组, fired 是记录目前触发的文件描述符任务的数组, timeEventHead 是记录定时任务的链表头,
beforesleep 和 aftersleep 分别在进入等待的开始和结束时执行, stop 标志着是否应该停止事件循环, apidata 用于等待事件接口。
/* State of an event based program */
typedef struct aeEventLoop {
  int maxfd;  /* highest file descriptor currently registered */
  int setsize; /* max number of file descriptors tracked */
  long long timeEventNextId;
  time_t lastTime;  /* Used to detect system clock skew */
  aeFileEvent *events; /* Registered events */
  aeFiredEvent *fired; /* Fired events */
  aeTimeEvent *timeEventHead;
  int stop;
  void *apidata; /* This is used for polling API specific data */
  aeBeforeSleepProc *beforesleep;
  aeBeforeSleepProc *aftersleep;
} aeEventLoop;
当相关数据结构创建完成,使用 aeMain() 来启动一个事件循环:
void aeMain(aeEventLoop *eventLoop) {
  eventLoop->stop = 0;
  while (!eventLoop->stop) {
  if (eventLoop->beforesleep != NULL)
  eventLoop->beforesleep(eventLoop);
  aeProcessEvents(eventLoop, AE_ALL_EVENTS|AE_CALL_AFTER_SLEEP);
  }
}
在一个大循环里,如果 stop 标志没有设置,则继续循环。每次循环的开始,执行 beforesleep() ,接着进入 aeProcessEvent() 。 AE_ALL_EVENTS 表示处理文件描述符事件和定时事件; AE_CALL_AFTER_SLEEP 表示要执行 aftersleep()
函数。
接下来进入 aeProcessEvents()
/* Process every pending time event, then every pending file event
 * (that may be registered by time event callbacks just processed).
 * Without special flags the function sleeps until some file event
 * fires, or when the next time event occurs (if any).
 *
 * If flags is 0, the function does nothing and returns.
 * if flags has AE_ALL_EVENTS set, all the kind of events are processed.
 * if flags has AE_FILE_EVENTS set, file events are processed.
 * if flags has AE_TIME_EVENTS set, time events are processed.
 * if flags has AE_DONT_WAIT set the function returns ASAP until all
 * if flags has AE_CALL_AFTER_SLEEP set, the aftersleep callback is called.
 * the events that's possible to process without to wait are processed.
 *
 * The function returns the number of events processed. */
int aeProcessEvents(aeEventLoop *eventLoop, int flags)
{
  int processed = 0, numevents;

  /* Nothing to do? return ASAP */
  if (!(flags & AE_TIME_EVENTS) && !(flags & AE_FILE_EVENTS)) return 0;

  /* Note that we want call select() even if there are no
  * file events to process as long as we want to process time
  * events, in order to sleep until the next time event is ready
  * to fire. */
  if (eventLoop->maxfd != -1 ||
  ((flags & AE_TIME_EVENTS) && !(flags & AE_DONT_WAIT))) {
  int j;
  aeTimeEvent *shortest = NULL;
  struct timeval tv, *tvp;

  if (flags & AE_TIME_EVENTS && !(flags & AE_DONT_WAIT))
  shortest = aeSearchNearestTimer(eventLoop);
  if (shortest) {
  long now_sec, now_ms;

  aeGetTime(&now_sec, &now_ms);
  tvp = &tv;

  /* How many milliseconds we need to wait for the next
  * time event to fire? */
  long long ms =
  (shortest->when_sec - now_sec)*1000 +
  shortest->when_ms - now_ms;

  if (ms > 0) {
  tvp->tv_sec = ms/1000;
  tvp->tv_usec = (ms % 1000)*1000;
  } else {
  tvp->tv_sec = 0;
  tvp->tv_usec = 0;
  }
  } else {
  /* If we have to check for events but need to return
  * ASAP because of AE_DONT_WAIT we need to set the timeout
  * to zero */
  if (flags & AE_DONT_WAIT) {
  tv.tv_sec = tv.tv_usec = 0;
  tvp = &tv;
  } else {
  /* Otherwise we can block */
  tvp = NULL; /* wait forever */
  }
  }

  /* Call the multiplexing API, will return only on timeout or when
  * some event fires. */
  numevents = aeApiPoll(eventLoop, tvp);

  /* After sleep callback. */
  if (eventLoop->aftersleep != NULL && flags & AE_CALL_AFTER_SLEEP)
  eventLoop->aftersleep(eventLoop);

  for (j = 0; j < numevents; j++) {
  aeFileEvent *fe = &eventLoop->events[eventLoop->fired[j].fd];
  int mask = eventLoop->fired[j].mask;
  int fd = eventLoop->fired[j].fd;
  int rfired = 0;

  /* note the fe->mask & mask & ... code: maybe an already processed
  * event removed an element that fired and we still didn't
  * processed, so we check if the event is still valid. */
  if (fe->mask & mask & AE_READABLE) {
  rfired = 1;
  fe->rfileProc(eventLoop,fd,fe->clientData,mask);
  }
  if (fe->mask & mask & AE_WRITABLE) {
  if (!rfired || fe->wfileProc != fe->rfileProc)
  fe->wfileProc(eventLoop,fd,fe->clientData,mask);
  }
  processed++;
  }
  }
  /* Check time events */
  if (flags & AE_TIME_EVENTS)
  processed += processTimeEvents(eventLoop);

  return processed; /* return the number of processed file/time events */
}
aeApiPoll() 用多种方式实现,可以在编译时选择,作用是在设定的超时时间内监听文件描述符,如果事件可以触发,则将其信息填入 fired 数组。
如果设置了 AE_DONT_WAIT ,则将超时时间设置为 0 ,表示不等待直接返回。否则查找最近一个要触发的定时任务,将其触发时间作为超时时间传给
aeApiPoll() 。如果没有定时任务,则超时时间为 NULL ,表示等待直到文件描述符任务触发为止。
aeApiPoll() 返回后,从 fired 数组中获得所有触发的文件描述符任务,执行其回调函数。处理完文件描述符任务后,在 processTimeEvents() 里处理定时任务。
/* Process time events */
static int processTimeEvents(aeEventLoop *eventLoop) {
  int processed = 0;
  aeTimeEvent *te, *prev;
  long long maxId;
  time_t now = time(NULL);

  /* If the system clock is moved to the future, and then set back to the
  * right value, time events may be delayed in a random way. Often this
  * means that scheduled operations will not be performed soon enough.
  *
  * Here we try to detect system clock skews, and force all the time
  * events to be processed ASAP when this happens: the idea is that
  * processing events earlier is less dangerous than delaying them
  * indefinitely, and practice suggests it is. */
  if (now < eventLoop->lastTime) {
  te = eventLoop->timeEventHead;
  while(te) {
  te->when_sec = 0;
  te = te->next;
  }
  }
  eventLoop->lastTime = now;

  prev = NULL;
  te = eventLoop->timeEventHead;
  maxId = eventLoop->timeEventNextId-1;
  while(te) {
  long now_sec, now_ms;
  long long id;

  /* Remove events scheduled for deletion. */
  if (te->id == AE_DELETED_EVENT_ID) {
  aeTimeEvent *next = te->next;
  if (prev == NULL)
  eventLoop->timeEventHead = te->next;
  else
  prev->next = te->next;
  if (te->finalizerProc)
  te->finalizerProc(eventLoop, te->clientData);
  zfree(te);
  te = next;
  continue;
  }

  /* Make sure we don't process time events created by time events in
  * this iteration. Note that this check is currently useless: we always
  * add new timers on the head, however if we change the implementation
  * detail, this check may be useful again: we keep it here for future
  * defense. */
  if (te->id > maxId) {
  te = te->next;
  continue;
  }
  aeGetTime(&now_sec, &now_ms);
  if (now_sec > te->when_sec ||
  (now_sec == te->when_sec && now_ms >= te->when_ms))
  {
  int retval;

  id = te->id;
  retval = te->timeProc(eventLoop, id, te->clientData);
  processed++;
  if (retval != AE_NOMORE) {
  aeAddMillisecondsToNow(retval,&te->when_sec,&te->when_ms);
  } else {
  te->id = AE_DELETED_EVENT_ID;
  }
  }
  prev = te;
  te = te->next;
  }
  return processed;
}
在 processTimeevents() 中,遍历定时任务,如果有任务被设置成
AE_DELETED_EVENT_ID 则将其从链表中删除并执行其 finalizerProc() 函数。接着,函数判断每个定时任务是否到达设定的时间,如果已经到达,则执行
timeProc() ,并根据 timeProc() 的返回值决定是否设定
AE_DELETED_EVENT_ID 。
如果因系统时间调整导致当前时间早于上次处理时间任务的时间,则立即执行所有定时任务。需要注意的是,这一轮处理中添加进来的新定时任务不会在这一轮处理。
这个定时任务的处理方式是不精确的,可能会造成一定的延迟,任务远远早于指定时间执行的情况也会出现。
程序执行过程中,随时可以插入或删除任务,通过 aeCreateFileEvent() 可以添加一个文件描述符任务, aeDeleteFileEvent() 则负责将文件描述符删除。于此对应的, aeCreateTimeEvent() 负责添加一个定时任务,
aeDeleteTimeEvent 则会将定时任务删除。
aeApiPoll() 有多种实现方式,这里只描述 epoll 方式。 epoll 是 linux 内核提供的 I/O 事件通知机制。通过 epoll_create1() 创建一个文件描述符
epollfd 后可以将需要监听的文件描述符构建成 struct epoll_event 通过
epoll_ctl() 添加到与之相对应的监听列表中。 随后通过 epoll_wait() 监听
epollfd 关联的文件描述符,如果发现可读或可写,则返回,并将触发的事件写入 struct epoll_event 数组中。
aeApiCreate() 创建了 struct epoll_event 数组以及通过 epoll_create() 创建 epoll 文件描述符,并将 eventLoop->apidata 指向一个 aeApiState 结构,结构中保存 epoll 文件描述符和 aeEventLoop 的地址,方便在其他函数中引用。这个函数在 aeCreateEventLoop() 中调用。
static int aeApiCreate(aeEventLoop *eventLoop) {
  aeApiState *state = zmalloc(sizeof(aeApiState));

  if (!state) return -1;
  state->events = zmalloc(sizeof(struct epoll_event)*eventLoop->setsize);
  if (!state->events) {
  zfree(state);
  return -1;
  }
  state->epfd = epoll_create(1024); /* 1024 is just a hint for the kernel */
  if (state->epfd == -1) {
  zfree(state->events);
  zfree(state);
  return -1;
  }
  eventLoop->apidata = state;
  return 0;
}
函数 aeApiAddEvent() 和 aeApiDelEvent() 通过 epoll_Ctl() 实现了添加和删除事件的功能。在 aeApiPoll() 中,将通过调用 epoll_wait 等待事件发生或超时,并将触发的事件的信息填入 fired 数组。
static int aeApiPoll(aeEventLoop *eventLoop, struct timeval *tvp) {
  aeApiState *state = eventLoop->apidata;
  int retval, numevents = 0;

  retval = epoll_wait(state->epfd,state->events,eventLoop->setsize,
  tvp ? (tvp->tv_sec*1000 + tvp->tv_usec/1000) : -1);
  if (retval > 0) {
  int j;

  numevents = retval;
  for (j = 0; j < numevents; j++) {
  int mask = 0;
  struct epoll_event *e = state->events+j;

  if (e->events & EPOLLIN) mask |= AE_READABLE;
  if (e->events & EPOLLOUT) mask |= AE_WRITABLE;
  if (e->events & EPOLLERR) mask |= AE_WRITABLE;
  if (e->events & EPOLLHUP) mask |= AE_WRITABLE;
  eventLoop->fired[j].fd = e->data.fd;
  eventLoop->fired[j].mask = mask;
  }
  }
  return numevents;
}
这也是大多数现代 linux 程序处理事件的大致流程。
redis 实现了一个可变长度的字符串,相比 C 语言的内置字符串结构,是个极大的优化,避免了内置 C 语言字符串带来的许多问题。许多 0Day 漏洞都与不正确的字符串处理有关,对字符串的合理封装有效的解决许多安全问题。
与其它 redis 功能不同,sds 的测试并没有使用 Tcl 实现,而是直接写在
sds.c 的结尾。如果编译时使用 make test-sds 则执行这些测试用例。
在 testhelp.h 中定义了俄式需要的两个宏,一个负责打印一个测试用例是否通过,另一个负责统计最终测试了多少个用例,有多少个通过,多少个失败:
int __failed_tests = 0;
int __test_num = 0;
#define test_cond(descr,_c) do { \
  __test_num++; printf("%d - %s: ", __test_num, descr); \
  if(_c) printf("PASSED\n"); else {printf("FAILED\n"); __failed_tests++;} \
} while(0);
#define test_report() do { \
  printf("%d tests, %d passed, %d failed\n", __test_num, \
  __test_num-__failed_tests, __failed_tests); \
  if (__failed_tests) { \
  printf("=== WARNING === We have failed tests here...\n"); \
  exit(1); \
  } \
} while(0);
在 sds.c 的结尾,如果定义了宏 SDS_TEST_MAIN ,则执行测试用例。可以在
Makefile 中制定 gcc -DSDS_TEST_MAIN 在编译的时候定义这个宏就可以将测试相关的函数编译到目标中。
在测试代码中,如果要测试 sdsnew() ,只需要编写下面的代码即可:
sds x = sdsnew("foo"), y;

test_cond("Create a string and obtain the length",
sdslen(x) == 3 && memcmp(x,"foo\0",4) == 0)
为了让 sds 与 C 语言内置字符串兼容, sds 的定义与 C 语言内置字符串相同:
typedef char *sds;
与 C 语言内置字符串一样, sds 也以一个空字符 \0 结尾,但 sds 拥有更多的信息隐藏在 sds 变量指针之前,这些信息称为 ”header"。Header 中包含了字符串的长度 len ,已经分配了多少空 alloc 间,以及一个指向真正字符串数据的指针 buf[] 。为了节省空间, sds 定义了三种类型的 header,分别用 5
bit,8 bit,16 bit,32 bit,64 bit 表示 len 和 alloc :
/* Note: sdshdr5 is never used, we just access the flags byte directly.
 * However is here to document the layout of type 5 SDS strings. */
struct __attribute__ ((__packed__)) sdshdr5 {
  unsigned char flags; /* 3 lsb of type, and 5 msb of string length */
  char buf[];
};
struct __attribute__ ((__packed__)) sdshdr8 {
  uint8_t len; /* used */
  uint8_t alloc; /* excluding the header and null terminator */
  unsigned char flags; /* 3 lsb of type, 5 unused bits */
  char buf[];
};
struct __attribute__ ((__packed__)) sdshdr16 {
  uint16_t len; /* used */
  uint16_t alloc; /* excluding the header and null terminator */
  unsigned char flags; /* 3 lsb of type, 5 unused bits */
  char buf[];
};
struct __attribute__ ((__packed__)) sdshdr32 {
  uint32_t len; /* used */
  uint32_t alloc; /* excluding the header and null terminator */
  unsigned char flags; /* 3 lsb of type, 5 unused bits */
  char buf[];
};
struct __attribute__ ((__packed__)) sdshdr64 {
  uint64_t len; /* used */
  uint64_t alloc; /* excluding the header and null terminator */
  unsigned char flags; /* 3 lsb of type, 5 unused bits */
  char buf[];
};
其中 len 表示数据部分的字符串长度; alloc 表示已经分配了多少长度的内存,这个值等于目前的 buf[] 可以容纳的最大字符串长度,它不包含 header 和
\0 。
sdshdr5 复用了 flags 变量,同时表示 flags 和长度 len ,低三 bit 表示类型,高 5 bit 表示长度。
数据结构的最后一个字段 buf[] 用于指向保存数据的位置,这么定义是有道理的,比如要申请一段内存,用来容纳 200 个字节长度的字符串,只需要:
char * str = "200 length of string ...";
sdshdr8 *hr = (sdshdr8*)malloc(sizeof(sdshdr8) + 200 + 1);
hr->len = 200;
hr->alloc = 200;
strncpy(hr->buf, str, 200);

sds my_sds_string = hr->buf;
加 1 是为了容纳字符串结束标志 \0 。
最终 sds 变量都是指向 buf[] 的指针, sds[-1] 可以获得 flags 。
__attribute__ ((__packed__)) 令数据结构内部按照字节对齐,如果没有指定,则 sdshdr32 会按照 4 字节对齐,那么 flags 将变成 sds[-4] ,而不是
sds[-1] 。
接下来 sds 定义了一系列宏,方便了对这个数据结构的区分和转换:
/*
 * flags 类型
 */
#define SDS_TYPE_5  0
#define SDS_TYPE_8  1
#define SDS_TYPE_16 2
#define SDS_TYPE_32 3
#define SDS_TYPE_64 4

/*
 * 头部数据结构使用 flags 的低三位表示头部类型
 * header.flags & SDS_TYPE_MASK 就是数据结构的类型
 */
#define SDS_TYPE_MASK 7
#define SDS_TYPE_BITS 3

/*
 * 从 sds 变量获得其对应的头部,其中 T 是 5,8,16,32 或 64,必须是字面常量;
 * s 是一个 sds 变量
 */
#define SDS_HDR_VAR(T,s) struct sdshdr##T *sh = (struct sdshdr##T *)((s)-(sizeof(struct sdshdr##T)));
#define SDS_HDR(T,s) ((struct sdshdr##T *)((s)-(sizeof(struct sdshdr##T))))

/*
 * sdshdr5 使用 flags 的高 5 位表示长度
 */
#define SDS_TYPE_5_LEN(f) ((f)>>SDS_TYPE_BITS)
sdslen 函数统一了获得一个 sds 字符串长度的方法:
static inline size_t sdslen(const sds s) {
  unsigned char flags = s[-1];
  switch(flags&SDS_TYPE_MASK) {
  case SDS_TYPE_5:
  return SDS_TYPE_5_LEN(flags);
  case SDS_TYPE_8:
  return SDS_HDR(8,s)->len;
  case SDS_TYPE_16:
  return SDS_HDR(16,s)->len;
  case SDS_TYPE_32:
  return SDS_HDR(32,s)->len;
  case SDS_TYPE_64:
  return SDS_HDR(64,s)->len;
  }
  return 0;
}
使用类似的方法, sds 还定义了一系列涉及 header 的函数, sdsavail ,
sdssetlen , sdsHdrSize , sdsReqType 等。
sdsReqType 接受一个表示字符串长度的变量,返回一个可以容纳这个长度字符串的头部类型:
static inline char sdsReqType(size_t string_size) {
  if (string_size < 32)
  return SDS_TYPE_5;
  if (string_size < 0xff)
  return SDS_TYPE_8;
  if (string_size < 0xffff)
  return SDS_TYPE_16;
  if (string_size < 0xffffffff)
  return SDS_TYPE_32;
  return SDS_TYPE_64;
}
sdsnewlen 可以从一个内置字符串或者 sds 字符串创建一个新的 sds 字符串,他将自己判断使用哪种类型的 header 。如果要创建一个容纳 "abc" 的字符串,需要将 "abc" 和它的长度作为参数,例如:
sds mystring = sdsnewlen("abc", 3);
此后就可以像使用内置字符串一样使用 mystring 了。但使用 sds 的函数通常提供更好的安全性和性能。
sds sdsnewlen(const void *init, size_t initlen) {
  void *sh;
  sds s;
  char type = sdsReqType(initlen);
  /* Empty strings are usually created in order to append. Use type 8
  * since type 5 is not good at this. */
  if (type == SDS_TYPE_5 && initlen == 0) type = SDS_TYPE_8;
  int hdrlen = sdsHdrSize(type);
  unsigned char *fp; /* flags pointer. */

  sh = s_malloc(hdrlen+initlen+1);
  if (sh == NULL) return NULL;
  if (!init)
  memset(sh, 0, hdrlen+initlen+1);
  s = (char*)sh+hdrlen;
  fp = ((unsigned char*)s)-1;
  switch(type) {
  case SDS_TYPE_5: {
  *fp = type | (initlen << SDS_TYPE_BITS);
  break;
  }
  case SDS_TYPE_8: {
  SDS_HDR_VAR(8,s);
  sh->len = initlen;
  sh->alloc = initlen;
  *fp = type;
  break;
  }
  case SDS_TYPE_16: {
  SDS_HDR_VAR(16,s);
  sh->len = initlen;
  sh->alloc = initlen;
  *fp = type;
  break;
  }
  case SDS_TYPE_32: {
  SDS_HDR_VAR(32,s);
  sh->len = initlen;
  sh->alloc = initlen;
  *fp = type;
  break;
  }
  case SDS_TYPE_64: {
  SDS_HDR_VAR(64,s);
  sh->len = initlen;
  sh->alloc = initlen;
  *fp = type;
  break;
  }
  }
  if (initlen && init)
  memcpy(s, init, initlen);
  s[initlen] = '\0';
  return s;
}
sdsfree 负责释放一个 sds 字符串:
void sdsfree(sds s) {
  if (s == NULL) return;
  s_free((char*)s-sdsHdrSize(s[-1]));
}
以上两个函数的 s_malloc 和 s_free 函数作用与 malloc 和 free 的作用相同。
sdsMakeRoomFor() 将增加一个 sds 变量的存储空间,以容纳更大的字符串:
sds sdsMakeRoomFor(sds s, size_t addlen) {
  void *sh, *newsh;
  size_t avail = sdsavail(s);
  size_t len, newlen;
  char type, oldtype = s[-1] & SDS_TYPE_MASK;
  int hdrlen;

  /* Return ASAP if there is enough space left. */
  if (avail >= addlen) return s;

  len = sdslen(s);
  sh = (char*)s-sdsHdrSize(oldtype);
  newlen = (len+addlen);
  if (newlen < SDS_MAX_PREALLOC)
  newlen *= 2;
  else
  newlen += SDS_MAX_PREALLOC;

  type = sdsReqType(newlen);

  /* Don't use type 5: the user is appending to the string and type 5 is
  * not able to remember empty space, so sdsMakeRoomFor() must be called
  * at every appending operation. */
  if (type == SDS_TYPE_5) type = SDS_TYPE_8;

  hdrlen = sdsHdrSize(type);
  if (oldtype==type) {
  newsh = s_realloc(sh, hdrlen+newlen+1);
  if (newsh == NULL) return NULL;
  s = (char*)newsh+hdrlen;
  } else {
  /* Since the header size changes, need to move the string forward,
  * and can't use realloc */
  newsh = s_malloc(hdrlen+newlen+1);
  if (newsh == NULL) return NULL;
  memcpy((char*)newsh+hdrlen, s, len+1);
  s_free(sh);
  s = (char*)newsh+hdrlen;
  s[-1] = type;
  sdssetlen(s, len);
  }
  sdssetalloc(s, newlen);
  return s;
}
sdsRemoveFreeSpace() 将多余的空间释放以节省内存:
sds sdsRemoveFreeSpace(sds s) {
  void *sh, *newsh;
  char type, oldtype = s[-1] & SDS_TYPE_MASK;
  int hdrlen;
  size_t len = sdslen(s);
  sh = (char*)s-sdsHdrSize(oldtype);

  type = sdsReqType(len);
  hdrlen = sdsHdrSize(type);
  if (oldtype==type) {
  newsh = s_realloc(sh, hdrlen+len+1);
  if (newsh == NULL) return NULL;
  s = (char*)newsh+hdrlen;
  } else {
  newsh = s_malloc(hdrlen+len+1);
  if (newsh == NULL) return NULL;
  memcpy((char*)newsh+hdrlen, s, len+1);
  s_free(sh);
  s = (char*)newsh+hdrlen;
  s[-1] = type;
  sdssetlen(s, len);
  }
  sdssetalloc(s, len);
  return s;
}
以上这些就是 sds 的核心代码,其它的都是走流程,在此不再重复。
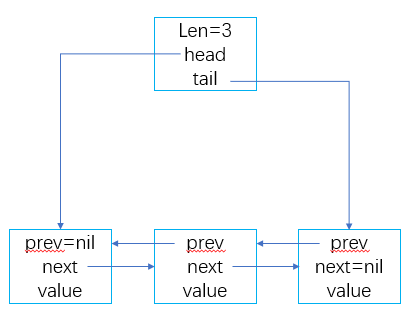
redis 实现的双链表结构算是个可用的代码。如果需要,可以移植到自己的项目中,与 linux 内核的链表相比也算各有优劣吧。
redis 的双链表结构大致如下图所示。链表头包含了链表的长度 lan ,以及指向链表首尾的指针 head, tail 。每个链表节点都有一个指向上一个链表节点的指针
prev 和指向下一个链表节点的指针 next 。第一个节点的 prev 和最后一个节点的 next 值为 NULL 。
代码表示的数据结构如下:
typedef struct listNode {
  struct listNode *prev;
  struct listNode *next;
  void *value;
} listNode;

typedef struct listIter {
  listNode *next;
  int direction;
} listIter;

typedef struct list {
  listNode *head;
  listNode *tail;
  void *(*dup)(void *ptr);
  void (*free)(void *ptr);
  int (*match)(void *ptr, void *key);
  unsigned long len;
} list;
ilsstNode 是链表节点; list 是链表头; listIter 是迭代器,在遍历链表时使用,可以指定从头像尾遍历 (AL_START_HEAD),也可以从相反的方向遍历
(AL_START_TAIL)。
初始化时,链表只有一个头,长度为 0 , 其余指针皆为空。
list *listCreate(void)
{
  struct list *list;

  if ((list = zmalloc(sizeof(*list))) == NULL)
  return NULL;
  list->head = list->tail = NULL;
  list->len = 0;
  list->dup = NULL;
  list->free = NULL;
  list->match = NULL;
  return list;
}
向头部插入一个节点时,如果链表为空,则将表头 head 和 tail 指向这个节点,并将节点的 prev 和 next 都置空值;否则将节点的 prev 置空值, next 指向链表第一个节点,链表的第一个节点的 prev 指向新节点,头部的 head 指向新节点。
list *listAddNodeHead(list *list, void *value)
{
  listNode *node;

  if ((node = zmalloc(sizeof(*node))) == NULL)
  return NULL;
  node->value = value;
  if (list->len == 0) {
  list->head = list->tail = node;
  node->prev = node->next = NULL;
  } else {
  node->prev = NULL;
  node->next = list->head;
  list->head->prev = node;
  list->head = node;
  }
  list->len++;
  return list;
}
要删除一个节点,就要把它两边的两个节点互相链接,但是要特别处理删除第一个节点和最后一个节点的情况。
void listDelNode(list *list, listNode *node)
{
  if (node->prev)
  node->prev->next = node->next;
  else
  list->head = node->next;
  if (node->next)
  node->next->prev = node->prev;
  else
  list->tail = node->prev;
  if (list->free) list->free(node->value);
  zfree(node);
  list->len--;
}
链表的查找需要遍历,如果设置了 match 函数,则通过 match 函数的返回值判断是否时需要的节点,否则直接比较 value 。
listNode *listSearchKey(list *list, void *key)
{
  listIter iter;
  listNode *node;

  listRewind(list, &iter);
  while((node = listNext(&iter)) != NULL) {
  if (list->match) {
  if (list->match(node->value, key)) {
  return node;
  }
  } else {
  if (key == node->value) {
  return node;
  }
  }
  }
  return NULL;
}
redis 的哈希表结构是 dict 。每个节点存储着 key 和 value,以及冲突时链表结构需要的 next 指针指向下一个节点。 dictType 里保存着哈希表的辅助操作,包括哈希函数, key 和 value 的复制或析构函数,key 的比较函数。真实面向对象的方法,用在这里正合适。
哈希表需要一个数组保存节点,下面就是这个数组头的定义。 dict 可能需要扩充容量,需要两个这样的数组结构,在扩充容量后重新计算哈希值时从旧数组转移到新数组。整个 dict 结构如下:
typedef struct dict {
  dictType *type;
  void *privdata;
  dictht ht[2];
  long rehashidx; /* rehashing not in progress if rehashidx == -1 */
  unsigned long iterators; /* number of iterators currently running */
} dict;
dict 默认使用 siphash 作为哈希函数,也可以自己指定哈希函数。创建哈希表时,需要指定 dictType 。
要插入一个点,需要通过哈希函数找到对应的 table 下标,放到这个下标对应的数组头部即可。如果要查找一个元素,先计算 table 下标,再遍历对应链表找到匹配的 key。
typedef struct dictht {
  dictEntry **table;
  unsigned long size;
  unsigned long sizemask;
  unsigned long used;
} dictht;
位图是表示某个有限集合中各元素是否拥有某种性质的数据结构。位图可以表述形如 \(X\rightarrow\{0, 1\},\ (X\subset N)\) 的关系。位图由一块内存组成,每个比特都表示一个元素,也就是上述映射的定义域,每个比特的值就是其对应的映射值。
bitops.c 定义了位图相关的函数。第一个函数 redisPopcount() 统计一个位图里有几个比特是置 1 的,也就是求出一个位图的 Hamming weight。函数结合使用了打表和分治法。首先将一个字节所有可能值 (0~255) 对应的 Hamming
weight 全部列举,存入 bitsinbyte[] 中,一个字节 char x 的 Hamming
weight 就是 bisinbyte[x] 。 redisPopcount() 以 7 字节为一组使用分治法计算,剩余的字节数使用打表法获得,最后将所有计算结果累加就是 Hamming weight。
分治法虽然可能不是最快的方法,但一定是最骚的。Hamming weight,则先将比特位两两分组,组内两个比特累加获得组内的 Hamming weight。此后再计算每相邻两组 Hamming weight 的和,获得按照每组 4bit 分组后各组的 Hamming weight。以此类推不断求和即可得到总的 Haming weight。
例如,要计算数字 372063667 的 Hamming weight,需要如下图所示依次对相邻两个数字相加即可。
00010110001011010011110110110011
 0 1 1 1 0 1 2 1 0 2 2 1 1 2 0 2
  1  2  1  3  2  3  3  2
  3  4  5  5
  7  10
  17
要高效的实现这个过程,需要一些位运算的技巧。下面将使用 C 语言实现这个过程,并一步步减少需要的运算量。假设需要计算一个 uint64_t 的
Hamming weight。为了保护我的手指,先定义一些经常用到的常量:
const uint64_t m1  = 0x5555555555555555; //binary: 0101...
const uint64_t m2  = 0x3333333333333333; //binary: 00110011..
const uint64_t m4  = 0x0f0f0f0f0f0f0f0f; //binary:  4 zeros,  4 ones ...
const uint64_t m8  = 0x00ff00ff00ff00ff; //binary:  8 zeros,  8 ones ...
const uint64_t m16 = 0x0000ffff0000ffff; //binary: 16 zeros, 16 ones ...
const uint64_t m32 = 0x00000000ffffffff; //binary: 32 zeros, 32 ones
const uint64_t hff = 0xffffffffffffffff; //binary: all ones
const uint64_t h01 = 0x0101010101010101; //the sum of 256 to the power of 0,1,2,3...
首先是第一个实现,需要 24 个运算:
int popcount64a(uint64_t x)
{
  x = (x & m1) + ((x >>  1) & m1); //put count of each  2 bits into those  2 bits
  x = (x & m2) + ((x >>  2) & m2); //put count of each  4 bits into those  4 bits
  x = (x & m4) + ((x >>  4) & m4); //put count of each  8 bits into those  8 bits
  x = (x & m8) + ((x >>  8) & m8); //put count of each 16 bits into those 16 bits
  x = (x & m16) + ((x >> 16) & m16); //put count of each 32 bits into those 32 bits
  x = (x & m32) + ((x >> 32) & m32); //put count of each 64 bits into those 64 bits
  return x;
}
这个实现复用了变量 x 的内存区域,将累加的中间结果也存储在 x 中。首先是
m1 这一行, (x & m1) 获得 x 的奇数比特位, (x >> 1) & m1 获得 x 的偶数比特位,两者累加的结果就是将 x 的比特两两分组,组内累加得到的结果存储在各个组内两个比特的位置。 m2 行也是一样的道理,累加相邻的 m1 分组中累加和,存储在原来两个相邻分组的 4bit 空间中。以此类推,最终获得 Hamming
weight。这有点像线段树区间求和的过程。
第二个实现使用 17 个运算,是对上一个实现的改进:
int popcount64b(uint64_t x)
{
  x -= (x >> 1) & m1;  //put count of each 2 bits into those 2 bits
  x = (x & m2) + ((x >> 2) & m2); //put count of each 4 bits into those 4 bits
  x = (x + (x >> 4)) & m4;  //put count of each 8 bits into those 8 bits
  x += x >>  8;  //put count of each 16 bits into their lowest 8 bits
  x += x >> 16;  //put count of each 32 bits into their lowest 8 bits
  x += x >> 32;  //put count of each 64 bits into their lowest 8 bits
  return x & 0x7f;
}
m1 行与上一个实现的 m1 行做的是一样的事情,这需要一点解释:
可以看到 m1 行就是是比特位两两分组后组内累加结果保存在本组对应两个比特位,与上一个实现的 m1 行相同。
m2 行和上一个实现是一样的,下面看 m4 行。因为 8 比特的 Hamming weigth
绝对不会超过 8,所以最后累加只会存储到最多 4 比特的空间内,所以直接移位相加取后四位就是这个分组的累加和。
因为 64 比特的 Hamming weight 存储空间绝对不会超过 8 比特,后面三行代码将目前所有分组 (8 bit 一组) 的值都累加到最右边的 8 个比特中,最后直接与 0x7f 返回最右边的一个字节即可。此处最后与 0xFF 或许更明白,但 7
比特的存储空间已经足够了。
第三个实现更加简单,使用 12 个运算,但其中有一个是乘法。这是使用运算最少的实现。
int popcount64c(uint64_t x)
{
  x -= (x >> 1) & m1;  //put count of each 2 bits into those 2 bits
  x = (x & m2) + ((x >> 2) & m2); //put count of each 4 bits into those 4 bits
  x = (x + (x >> 4)) & m4;  //put count of each 8 bits into those 8 bits
  return (x * h01) >> 56;  //returns left 8 bits of x + (x<<8) + (x<<16) + (x<<24) + ...
}
与上一个实现不一样的地方只有最后一行。 (x * h01) 意思是将目前所有 8 比特一组的分组都累加到最左边的一个字节上, 使用小学提到的竖式乘法表示,很容易哈先 x*h01 就是 x + (x<<8) + (x<<16) + (x<<24) + ... 。最后右移 56
比特得到最左边的 8 比特就是结果,将其返回。
redisPopcount() 使用了最后这个实现:
size_t redisPopcount(void *s, long count) {
  size_t bits = 0;
  unsigned char *p = s;
  uint32_t *p4;
  static const unsigned char bitsinbyte[256] = {0,1,1,2,1,2,2,3,1,2,2,3,2,3,3,4,1,2,2,3,2,3,3,4,2,3,3,4,3,4,4,5,1,2,2,3,2,3,3,4,2,3,3,4,3,4,4,5,2,3,3,4,3,4,4,5,3,4,4,5,4,5,5,6,1,2,2,3,2,3,3,4,2,3,3,4,3,4,4,5,2,3,3,4,3,4,4,5,3,4,4,5,4,5,5,6,2,3,3,4,3,4,4,5,3,4,4,5,4,5,5,6,3,4,4,5,4,5,5,6,4,5,5,6,5,6,6,7,1,2,2,3,2,3,3,4,2,3,3,4,3,4,4,5,2,3,3,4,3,4,4,5,3,4,4,5,4,5,5,6,2,3,3,4,3,4,4,5,3,4,4,5,4,5,5,6,3,4,4,5,4,5,5,6,4,5,5,6,5,6,6,7,2,3,3,4,3,4,4,5,3,4,4,5,4,5,5,6,3,4,4,5,4,5,5,6,4,5,5,6,5,6,6,7,3,4,4,5,4,5,5,6,4,5,5,6,5,6,6,7,4,5,5,6,5,6,6,7,5,6,6,7,6,7,7,8};

  /* Count initial bytes not aligned to 32 bit. */
  while((unsigned long)p & 3 && count) {
  bits += bitsinbyte[*p++];
  count--;
  }

  /* Count bits 28 bytes at a time */
  p4 = (uint32_t*)p;
  while(count>=28) {
  uint32_t aux1, aux2, aux3, aux4, aux5, aux6, aux7;

  aux1 = *p4++;
  aux2 = *p4++;
  aux3 = *p4++;
  aux4 = *p4++;
  aux5 = *p4++;
  aux6 = *p4++;
  aux7 = *p4++;
  count -= 28;

  aux1 = aux1 - ((aux1 >> 1) & 0x55555555);
  aux1 = (aux1 & 0x33333333) + ((aux1 >> 2) & 0x33333333);
  aux2 = aux2 - ((aux2 >> 1) & 0x55555555);
  aux2 = (aux2 & 0x33333333) + ((aux2 >> 2) & 0x33333333);
  aux3 = aux3 - ((aux3 >> 1) & 0x55555555);
  aux3 = (aux3 & 0x33333333) + ((aux3 >> 2) & 0x33333333);
  aux4 = aux4 - ((aux4 >> 1) & 0x55555555);
  aux4 = (aux4 & 0x33333333) + ((aux4 >> 2) & 0x33333333);
  aux5 = aux5 - ((aux5 >> 1) & 0x55555555);
  aux5 = (aux5 & 0x33333333) + ((aux5 >> 2) & 0x33333333);
  aux6 = aux6 - ((aux6 >> 1) & 0x55555555);
  aux6 = (aux6 & 0x33333333) + ((aux6 >> 2) & 0x33333333);
  aux7 = aux7 - ((aux7 >> 1) & 0x55555555);
  aux7 = (aux7 & 0x33333333) + ((aux7 >> 2) & 0x33333333);
  bits += ((((aux1 + (aux1 >> 4)) & 0x0F0F0F0F) +
  ((aux2 + (aux2 >> 4)) & 0x0F0F0F0F) +
  ((aux3 + (aux3 >> 4)) & 0x0F0F0F0F) +
  ((aux4 + (aux4 >> 4)) & 0x0F0F0F0F) +
  ((aux5 + (aux5 >> 4)) & 0x0F0F0F0F) +
  ((aux6 + (aux6 >> 4)) & 0x0F0F0F0F) +
  ((aux7 + (aux7 >> 4)) & 0x0F0F0F0F))* 0x01010101) >> 24;
  }
  /* Count the remaining bytes. */
  p = (unsigned char*)p4;
  while(count--) bits += bitsinbyte[*p++];
  return bits;
}
实际上很多处理器都提供了获得寄存器的 Hamming weight 的指令,如果使用 GNU 的编译器,可以使用内置函数:
int __builtin_popcount (unsigned int x);
int __builtin_popcountll (unsigned long long x);
redisBitpos() 通过 8 字节一组检查是否是全 0 或全 1,然后在这 8 个字节内找到第一个非全 0 或全 1 的字节,最后在字节内部定位第一个需要查找的比特:
/* Return the position of the first bit set to one (if 'bit' is 1) or
 * zero (if 'bit' is 0) in the bitmap starting at 's' and long 'count' bytes.
 *
 * The function is guaranteed to return a value >= 0 if 'bit' is 0 since if
 * no zero bit is found, it returns count*8 assuming the string is zero
 * padded on the right. However if 'bit' is 1 it is possible that there is
 * not a single set bit in the bitmap. In this special case -1 is returned. */
long redisBitpos(void *s, unsigned long count, int bit) {
  unsigned long *l;
  unsigned char *c;
  unsigned long skipval, word = 0, one;
  long pos = 0; /* Position of bit, to return to the caller. */
  unsigned long j;
  int found;

  /* Process whole words first, seeking for first word that is not
  * all ones or all zeros respectively if we are lookig for zeros
  * or ones. This is much faster with large strings having contiguous
  * blocks of 1 or 0 bits compared to the vanilla bit per bit processing.
  *
  * Note that if we start from an address that is not aligned
  * to sizeof(unsigned long) we consume it byte by byte until it is
  * aligned. */

  /* Skip initial bits not aligned to sizeof(unsigned long) byte by byte. */
  skipval = bit ? 0 : UCHAR_MAX;
  c = (unsigned char*) s;
  found = 0;
  while((unsigned long)c & (sizeof(*l)-1) && count) {
  if (*c != skipval) {
  found = 1;
  break;
  }
  c++;
  count--;
  pos += 8;
  }

  /* Skip bits with full word step. */
  l = (unsigned long*) c;
  if (!found) {
  skipval = bit ? 0 : ULONG_MAX;
  while (count >= sizeof(*l)) {
  if (*l != skipval) break;
  l++;
  count -= sizeof(*l);
  pos += sizeof(*l)*8;
  }
  }

  /* Load bytes into "word" considering the first byte as the most significant
  * (we basically consider it as written in big endian, since we consider the
  * string as a set of bits from left to right, with the first bit at position
  * zero.
  *
  * Note that the loading is designed to work even when the bytes left
  * (count) are less than a full word. We pad it with zero on the right. */
  c = (unsigned char*)l;
  for (j = 0; j < sizeof(*l); j++) {
  word <<= 8;
  if (count) {
  word |= *c;
  c++;
  count--;
  }
  }

  /* Special case:
  * If bits in the string are all zero and we are looking for one,
  * return -1 to signal that there is not a single "1" in the whole
  * string. This can't happen when we are looking for "0" as we assume
  * that the right of the string is zero padded. */
  if (bit == 1 && word == 0) return -1;

  /* Last word left, scan bit by bit. The first thing we need is to
  * have a single "1" set in the most significant position in an
  * unsigned long. We don't know the size of the long so we use a
  * simple trick. */
  one = ULONG_MAX; /* All bits set to 1.*/
  one >>= 1;  /* All bits set to 1 but the MSB. */
  one = ~one;  /* All bits set to 0 but the MSB. */

  while(one) {
  if (((one & word) != 0) == bit) return pos;
  pos++;
  one >>= 1;
  }

  /* If we reached this point, there is a bug in the algorithm, since
  * the case of no match is handled as a special case before. */
  serverPanic("End of redisBitpos() reached.");
  return 0; /* Just to avoid warnings. */
}
基数树用于存储字符串集合的树形结构,比如一个包含 "foo", "foobar" 和 "footer" 的基数树:
(f) ""
\
(o) "f"
\
(o) "fo"
\
[t  b] "foo"
/  \
"foot" (e)  (a) "foob"
/  \
"foote" (r)  (r) "fooba"
/  \
"footer" []  [] "foobar"
上图中 [] 表示这个节点代表的字符串在集合中 (字符串属于 key), () 表示其它情况。这个表示是不准确的,因为基数树的字符在边上而不是在节点上。上述实现需要消耗大量的空间,很多节点可以合并成一个节点。
redis 的实现压缩了只有一个子节点又比表示 key 的节点,如下图所示:
["foo"] ""
|
[t  b] "foo"
/  \
"foot" ("er")  ("ar") "foob"
/  \
"footer" []  [] "foobar"
这个实现需要更复杂的操作,比如上述基数树要插入 "first",就要把节点分裂:
(f) ""
/
(i o) "f"
/  \
"firs"  ("rst")  (o) "fo"
/  \
"first" []  [t  b] "foo"
/  \
"foot" ("er")  ("ar") "foob"
/  \
"footer" []  [] "foobar"
当要删除这个 key 时,又需要合并节点。
节点的结构如下:
typedef struct raxNode {
  uint32_t iskey:1;  /* Does this node contain a key? */
  uint32_t isnull:1;  /* Associated value is NULL (don't store it). */
  uint32_t iscompr:1;  /* Node is compressed. */
  uint32_t size:29;  /* Number of children, or compressed string len. */
  /* Data layout is as follows:
  *
  * If node is not compressed we have 'size' bytes, one for each children
  * character, and 'size' raxNode pointers, point to each child node.
  * Note how the character is not stored in the children but in the
  * edge of the parents:
  *
  * [header strlen=0][abc][a-ptr][b-ptr][c-ptr](value-ptr?)
  *
  * if node is compressed (strlen != 0) the node has 1 children.
  * In that case the 'size' bytes of the string stored immediately at
  * the start of the data section, represent a sequence of successive
  * nodes linked one after the other, for which only the last one in
  * the sequence is actually represented as a node, and pointed to by
  * the current compressed node.
  *
  * [header strlen=3][xyz][z-ptr](value-ptr?)
  *
  * Both compressed and not compressed nodes can represent a key
  * with associated data in the radix tree at any level (not just terminal
  * nodes).
  *
  * If the node has an associated key (iskey=1) and is not NULL
  * (isnull=0), then after the raxNode pointers poiting to the
  * childen, an additional value pointer is present (as you can see
  * in the representation above as "value-ptr" field).
  */
  unsigned char data[];
} raxNode;
如果一个节点没有压缩 (iscompr=0),那么 data[] 存储的内容为 size 个字符表示每个子节点代表的字符,按照字典序排列,紧接着是 size 个指针指向对应的 size 个子节点。
如果一个节点已经压缩 (iscompr=1),那么这个节点只可能有一个子节点,此时
data[] 表示节点内包含的子字符串,一个指向子节点的指针。
rax 是一个树的结构,记录树根,元素数量以及节点数量。
typedef struct rax {
  raxNode *head;
  uint64_t numele;
  uint64_t numnodes;
} rax;
raxStack 是一个存储指针的栈结构,用于在遍历时辅助记录父节点的信息。
stack 时指向栈底的指针,开始时指向 static_items[] ,拥有 32 个存储空间。如果存储空间不足,程序将申请新的空间以容纳新的元素,此时 stack 将指向新的存储空间。这个 static_items[] 的设计减少了堆内存的请求次数。总之,
stack 指向栈底, stack[items] 指向栈顶的空闲位置。 如果一个节点是 key
(iskey=1) ,那么这个节点可能包含用户数据指针 (isnull=1)。
typedef struct raxStack {
  void **stack; /* Points to static_items or an heap allocated array. */
  size_t items, maxitems; /* Number of items contained and total space. */
  /* Up to RAXSTACK_STACK_ITEMS items we avoid to allocate on the heap
  * and use this static array of pointers instead. */
  void *static_items[RAX_STACK_STATIC_ITEMS];
  int oom; /* True if pushing into this stack failed for OOM at some point. */
} raxStack;
raxIterator 用于辅助基数树的遍历过程:
typedef struct raxIterator {
  int flags;
  rax *rt;  /* Radix tree we are iterating. */
  unsigned char *key;  /* The current string. */
  void *data;  /* Data associated to this key. */
  size_t key_len;  /* Current key length. */
  size_t key_max;  /* Max key len the current key buffer can hold. */
  unsigned char key_static_string[RAX_ITER_STATIC_LEN];
  raxNode *node;  /* Current node. Only for unsafe iteration. */
  raxStack stack;  /* Stack used for unsafe iteration. */
} raxIterator;
raxStack 是个后进先出的栈结构,保存指针。在这里,用于保存父节点的地址。栈的初始化只是简单的将结构赋初始值:
/* Initialize the stack. */
static inline void raxStackInit(raxStack *ts) {
  ts->stack = ts->static_items;
  ts->items = 0;
  ts->maxitems = RAX_STACK_STATIC_ITEMS;
  ts->oom = 0;
}
raxStackPush(raxStack *ts, void *ptr) 将指针 ptr 插入栈 ts 中,如果空间不足,则尝试申请新的空间:
/* Push an item into the stack, returns 1 on success, 0 on out of memory. */
static inline int raxStackPush(raxStack *ts, void *ptr) {
  if (ts->items == ts->maxitems) {
  if (ts->stack == ts->static_items) {
  ts->stack = rax_malloc(sizeof(void*)*ts->maxitems*2);
  if (ts->stack == NULL) {
  ts->stack = ts->static_items;
  ts->oom = 1;
  errno = ENOMEM;
  return 0;
  }
  memcpy(ts->stack,ts->static_items,sizeof(void*)*ts->maxitems);
  } else {
  void **newalloc = rax_realloc(ts->stack,sizeof(void*)*ts->maxitems*2);
  if (newalloc == NULL) {
  ts->oom = 1;
  errno = ENOMEM;
  return 0;
  }
  ts->stack = newalloc;
  }
  ts->maxitems *= 2;
  }
  ts->stack[ts->items] = ptr;
  ts->items++;
  return 1;
}
raxStackPop() 从栈顶弹出一个元素:
/* Pop an item from the stack, the function returns NULL if there are no
 * items to pop. */
static inline void *raxStackPop(raxStack *ts) {
  if (ts->items == 0) return NULL;
  ts->items--;
  return ts->stack[ts->items];
}
有时候需要获得栈顶元素,但不将其弹出, raxStackPeek() 完成这项工作:
/* Return the stack item at the top of the stack without actually consuming
 * it. */
static inline void *raxStackPeek(raxStack *ts) {
  if (ts->items == 0) return NULL;
  return ts->stack[ts->items-1];
}
stack 可能是从堆内存申请的,需要有一个函数判断是否应该将其释放,如果是则释放:
/* Free the stack in case we used heap allocation. */
static inline void raxStackFree(raxStack *ts) {
  if (ts->stack != ts->static_items) rax_free(ts->stack);
}
raxNewNode() 用于新建一个没有压缩的节点,如果 datafield 为真,则
data[] 将多申请一个指针的空间容纳指向卫星数据的指针。
/* Allocate a new non compressed node with the specified number of children.
 * If datafiled is true, the allocation is made large enough to hold the
 * associated data pointer.
 * Returns the new node pointer. On out of memory NULL is returned. */
raxNode *raxNewNode(size_t children, int datafield) {
  size_t nodesize = sizeof(raxNode)+children+
  sizeof(raxNode*)*children;
  if (datafield) nodesize += sizeof(void*);
  raxNode *node = rax_malloc(nodesize);
  if (node == NULL) return NULL;
  node->iskey = 0;
  node->isnull = 0;
  node->iscompr = 0;
  node->size = children;
  return node;
}
raxNew() 用于新建一个基数树:
/* Allocate a new rax and return its pointer. On out of memory the function
 * returns NULL. */
rax *raxNew(void) {
  rax *rax = rax_malloc(sizeof(*rax));
  if (rax == NULL) return NULL;
  rax->numele = 0;
  rax->numnodes = 1;
  rax->head = raxNewNode(0,0);
  if (rax->head == NULL) {
  rax_free(rax);
  return NULL;
  } else {
  return rax;
  }
}
一个节点占用多少空间是很繁琐的一个计算,redis 用一个宏
raxNodeCurrentLength 来完成这个计算:
/* Return the current total size of the node. */
#define raxNodeCurrentLength(n) (\
  sizeof(raxNode)+(n)->size+ \
  ((n)->iscompr ? sizeof(raxNode*) : sizeof(raxNode*)*(n)->size)+ \
  (((n)->iskey && !(n)->isnull)*sizeof(void*)) \)
raxReallocForData() 用于扩充一个节点的空间以容纳一个指针:
/* realloc the node to make room for auxiliary data in order
 * to store an item in that node. On out of memory NULL is returned. */
raxNode *raxReallocForData(raxNode *n, void *data) {
  if (data == NULL) return n; /* No reallocation needed, setting isnull=1 */
  size_t curlen = raxNodeCurrentLength(n);
  return rax_realloc(n,curlen+sizeof(void*));
}
raxSetData() 用于将数据指针存放到节点上:
/* Set the node auxiliary data to the specified pointer. */
void raxSetData(raxNode *n, void *data) {
  n->iskey = 1;
  if (data != NULL) {
  void **ndata = (void**)
  ((char*)n+raxNodeCurrentLength(n)-sizeof(void*));
  memcpy(ndata,&data,sizeof(data));
  n->isnull = 0;
  } else {
  n->isnull = 1;
  }
}
raxGetData() 用于从节点获得数据指针:
/* Get the node auxiliary data. */
void *raxGetData(raxNode *n) {
  if (n->isnull) return NULL;
  void **ndata =(void**)((char*)n+raxNodeCurrentLength(n)-sizeof(void*));
  void *data;
  memcpy(&data,ndata,sizeof(data));
  return data;
}
raxNode *raxAddChild(raxNode *n, unsigned char c, raxNode**childptr,raxNode ***parentlink)
向一个节点 n 插入一个表示字符 c 的子节点,并返回 n 的新地址。
parentlink 指向父节点 n 中指向新子节点的指针, childptr 存储新子节点的地址。新的父节点的空间将是旧空间加上一个容纳字符的字节以及一个容纳指针的空间。注意压缩节点是不能插入子节点的,必须分裂或才能插入。
/* Add a new child to the node 'n' representing the character 'c' and return
 * its new pointer, as well as the child pointer by reference. Additionally
 * '***parentlink' is populated with the raxNode pointer-to-pointer of where
 * the new child was stored, which is useful for the caller to replace the
 * child pointer if it gets reallocated.
 *
 * On success the new parent node pointer is returned (it may change because
 * of the realloc, so the caller should discard 'n' and use the new value).
 * On out of memory NULL is returned, and the old node is still valid. */
raxNode *raxAddChild(raxNode *n, unsigned char c, raxNode **childptr, raxNode ***parentlink) {
  assert(n->iscompr == 0);

  size_t curlen = sizeof(raxNode)+
  n->size+
  sizeof(raxNode*)*n->size;
  size_t newlen;

  /* Alloc the new child we will link to 'n'. */
  raxNode *child = raxNewNode(0,0);
  if (child == NULL) return NULL;

  /* Make space in the original node. */
  if (n->iskey) curlen += sizeof(void*);
  newlen = curlen+sizeof(raxNode*)+1; /* Add 1 char and 1 pointer. */
  raxNode *newn = rax_realloc(n,newlen);
  if (newn == NULL) {
  rax_free(child);
  return NULL;
  }
  n = newn;

  /* After the reallocation, we have 5/9 (depending on the system
  * pointer size) bytes at the end, that is, the additional char
  * in the 'data' section, plus one pointer to the new child:
  *
  * [numc][abx][ap][bp][xp]|auxp|.....
  *
  * Let's find where to insert the new child in order to make sure
  * it is inserted in-place lexicographically. */
  int pos;
  for (pos = 0; pos < n->size; pos++) {
  if (n->data[pos] > c) break;
  }

  /* Now, if present, move auxiliary data pointer at the end
  * so that we can mess with the other data without overwriting it.
  * We will obtain something like that:
  *
  * [numc][abx][ap][bp][xp].....|auxp| */
  unsigned char *src;
  if (n->iskey && !n->isnull) {
  src = n->data+n->size+sizeof(raxNode*)*n->size;
  memmove(src+1+sizeof(raxNode*),src,sizeof(void*));
  }

  /* Now imagine we are adding a node with edge 'c'. The insertion
  * point is between 'b' and 'x', so the 'pos' variable value is
  * To start, move all the child pointers after the insertion point
  * of 1+sizeof(pointer) bytes on the right, to obtain:
  *
  * [numc][abx][ap][bp].....[xp]|auxp| */
  src = n->data+n->size+sizeof(raxNode*)*pos;
  memmove(src+1+sizeof(raxNode*),src,sizeof(raxNode*)*(n->size-pos));

  /* Now make the space for the additional char in the data section,
  * but also move the pointers before the insertion point in the right
  * by 1 byte, in order to obtain the following:
  *
  * [numc][ab.x][ap][bp]....[xp]|auxp| */
  src = n->data+pos;
  memmove(src+1,src,n->size-pos+sizeof(raxNode*)*pos);

  /* We can now set the character and its child node pointer to get:
  *
  * [numc][abcx][ap][bp][cp]....|auxp|
  * [numc][abcx][ap][bp][cp][xp]|auxp| */
  n->data[pos] = c;
  n->size++;
  raxNode **childfield = (raxNode**)(n->data+n->size+sizeof(raxNode*)*pos);
  memcpy(childfield,&child,sizeof(child));
  *childptr = child;
  *parentlink = childfield;
  return n;
}
raxNodeLastChildPtr 可以获得一个节点的最后一个子节点,如果节点是压缩的,就返回唯一的节点。
/* Return the pointer to the last child pointer in a node. For the compressed
 * nodes this is the only child pointer. */
#define raxNodeLastChildPtr(n) ((raxNode**) (\
  ((char*)(n)) + \
  raxNodeCurrentLength(n) - \
  sizeof(raxNode*) - \
  (((n)->iskey && !(n)->isnull) ? sizeof(void*) : 0) \))
raxNodeFirstChildPtr 则返回第一个子节点:
/* Return the pointer to the first child pointer. */
#define raxNodeFirstChildPtr(n) ((raxNode**)((n)->data+(n)->size))
raxCompressNode() 用于压缩一个节点, n 必须没有子节点,新节点的空间需要容纳所有字符,以及一个子节点的指针。
/* Turn the node 'n', that must be a node without any children, into a
 * compressed node representing a set of nodes linked one after the other
 * and having exactly one child each. The node can be a key or not: this
 * property and the associated value if any will be preserved.
 *
 * The function also returns a child node, since the last node of the
 * compressed chain cannot be part of the chain: it has zero children while
 * we can only compress inner nodes with exactly one child each. */
raxNode *raxCompressNode(raxNode *n, unsigned char *s, size_t len, raxNode **child) {
  assert(n->size == 0 && n->iscompr == 0);
  void *data = NULL; /* Initialized only to avoid warnings. */
  size_t newsize;

  debugf("Compress node: %.*s\n", (int)len,s);

  /* Allocate the child to link to this node. */
  *child = raxNewNode(0,0);
  if (*child == NULL) return NULL;

  /* Make space in the parent node. */
  newsize = sizeof(raxNode)+len+sizeof(raxNode*);
  if (n->iskey) {
  data = raxGetData(n); /* To restore it later. */
  if (!n->isnull) newsize += sizeof(void*);
  }
  raxNode *newn = rax_realloc(n,newsize);
  if (newn == NULL) {
  rax_free(*child);
  return NULL;
  }
  n = newn;

  n->iscompr = 1;
  n->size = len;
  memcpy(n->data,s,len);
  if (n->iskey) raxSetData(n,data);
  raxNode **childfield = raxNodeLastChildPtr(n);
  memcpy(childfield,child,sizeof(*child));
  return n;
}
raxLowWalk() 在基数树中查找字符串 s 的位置,返回值是匹配过的字符数,
stopnode 是查找结束的位置, plink 是父节点,如果最后在压缩节点中停止,则 splitpos 记录节点中需要分裂的位置, ts 是一个栈,保存从根节点到停止节点经过的所有节点。
static inline size_t raxLowWalk(rax *rax, unsigned char *s, size_t len, raxNode **stopnode, raxNode ***plink, int *splitpos, raxStack *ts) {
  raxNode *h = rax->head;
  raxNode **parentlink = &rax->head;

  size_t i = 0; /* Position in the string. */
  size_t j = 0; /* Position in the node children (or bytes if compressed).*/
  while(h->size && i < len) {
  debugnode("Lookup current node",h);
  unsigned char *v = h->data;

  if (h->iscompr) {
  for (j = 0; j < h->size && i < len; j++, i++) {
  if (v[j] != s[i]) break;
  }
  if (j != h->size) break;
  } else {
  /* Even when h->size is large, linear scan provides good
  * performances compared to other approaches that are in theory
  * more sounding, like performing a binary search. */
  for (j = 0; j < h->size; j++) {
  if (v[j] == s[i]) break;
  }
  if (j == h->size) break;
  i++;
  }

  if (ts) raxStackPush(ts,h); /* Save stack of parent nodes. */
  raxNode **children = raxNodeFirstChildPtr(h);
  if (h->iscompr) j = 0; /* Compressed node only child is at index 0. */
  memcpy(&h,children+j,sizeof(h));
  parentlink = children+j;
  j = 0; /* If the new node is compressed and we do not
  iterate again (since i == l) set the split
  position to 0 to signal this node represents
  the searched key. */
  }
  if (stopnode) *stopnode = h;
  if (plink) *plink = parentlink;
  if (splitpos && h->iscompr) *splitpos = j;
  return i;
}
raxInsert() 负责插入一个元素,期间包括节点分裂的过程,比较复杂。首先调用 raxLowWalk() 确定插入位置。如果已经匹配的字符串长度等于要插入的字符串 s 的长度,并且停止节点不是压缩节点,那么要么字符串已经在基数树中,要么基数树里的节点足以表示这个字符串,只要调整节点修改相关字段即可。
如果 raxLowWalk() 在压缩节点停止,就要分裂这个节点以继续插入过程。节点分裂有 5 种情况,下面以一个基数树举例:
  "ANNIBALE" -> "SCO" -> []

1) Inserting "ANNIENTARE"

  |B| -> "ALE" -> "SCO" -> []
  "ANNI" -> |-|
  |E| -> (... continue algo ...) "NTARE" -> []

2) Inserting "ANNIBALI"

  |E| -> "SCO" -> []
  "ANNIBAL" -> |-|
  |I| -> (... continue algo ...) []

3) Inserting "AGO" (Like case 1, but set iscompr = 0 into original node)

  |N| -> "NIBALE" -> "SCO" -> []
  |A| -> |-|
  |G| -> (... continue algo ...) |O| -> []

4) Inserting "CIAO"

  |A| -> "NNIBALE" -> "SCO" -> []
  |-|
  |C| -> (... continue algo ...) "IAO" -> []

5) Inserting "ANNI"

  "ANNI" -> "BALE" -> "SCO" -> []
需要两个算法完成分裂操作:
算法1
当不是第 5 种情况时:
$NEXT 指针,也就是指向这个节点唯一子节点的指针。
3a. 如果 $SPLITPOS 为 0,则将用户数据复制到分裂节点上。
3b. 如果 $SPLITPOS 不为 0,减少这个节点的空间,因为只需要容纳
$splitpos 个字符。
4a. 如果分裂后剩余的字符长度不为 0,创建 postfix 节点,并将子节点指针指向 $NEXT 。
4b. 如果 postfix 节点长度为 0,则直接使用 $NEXT 节点作为 postfix 节点。
child[0] 为 postfix 节点。算法2
第 5 种情况种,如果在压缩节点停下但并不是不匹配,那么
$NEXT 。$SPLITPOS 到结束的所有字符。分裂之后,可能需要继续插入一个节点,以容纳没有匹配的字符:
/* Insert the element 's' of size 'len', setting as auxiliary data
 * the pointer 'data'. If the element is already present, the associated
 * data is updated, and 0 is returned, otherwise the element is inserted
 * and 1 is returned. On out of memory the function returns 0 as well but
 * sets errno to ENOMEM, otherwise errno will be set to 0. */
int raxInsert(rax *rax, unsigned char *s, size_t len, void *data, void **old) {
  size_t i;
  int j = 0; /* Split position. If raxLowWalk() stops in a compressed
  node, the index 'j' represents the char we stopped within the
  compressed node, that is, the position where to split the
  node for insertion. */
  raxNode *h, **parentlink;

  debugf("### Insert %.*s with value %p\n", (int)len, s, data);
  i = raxLowWalk(rax,s,len,&h,&parentlink,&j,NULL);

  /* If i == len we walked following the whole string. If we are not
  * in the middle of a compressed node, the string is either already
  * inserted or this middle node is currently not a key, but can represent
  * our key. We have just to reallocate the node and make space for the
  * data pointer. */
  if (i == len && (!h->iscompr || j == 0 /* not in the middle if j is 0 */)) {
  if (h->iskey) {
  if (old) *old = raxGetData(h);
  raxSetData(h,data);
  errno = 0;
  return 0; /* Element already exists. */
  }
  h = raxReallocForData(h,data);
  if (h == NULL) {
  errno = ENOMEM;
  return 0;
  }
  memcpy(parentlink,&h,sizeof(h));
  raxSetData(h,data);
  rax->numele++;
  return 1; /* Element inserted. */
  }

  /* ------------------------- ALGORITHM 1 --------------------------- */
  if (h->iscompr && i != len) {
  debugf("ALGO 1: Stopped at compressed node %.*s (%p)\n",
  h->size, h->data, (void*)h);
  debugf("Still to insert: %.*s\n", (int)(len-i), s+i);
  debugf("Splitting at %d: '%c'\n", j, ((char*)h->data)[j]);
  debugf("Other (key) letter is '%c'\n", s[i]);

  /* 1: Save next pointer. */
  raxNode **childfield = raxNodeLastChildPtr(h);
  raxNode *next;
  memcpy(&next,childfield,sizeof(next));
  debugf("Next is %p\n", (void*)next);
  debugf("iskey %d\n", h->iskey);
  if (h->iskey) {
  debugf("key value is %p\n", raxGetData(h));
  }

  /* Set the length of the additional nodes we will need. */
  size_t trimmedlen = j;
  size_t postfixlen = h->size - j - 1;
  int split_node_is_key = !trimmedlen && h->iskey && !h->isnull;
  size_t nodesize;

  /* 2: Create the split node. Also allocate the other nodes we'll need
  *  ASAP, so that it will be simpler to handle OOM. */
  raxNode *splitnode = raxNewNode(1, split_node_is_key);
  raxNode *trimmed = NULL;
  raxNode *postfix = NULL;

  if (trimmedlen) {
  nodesize = sizeof(raxNode)+trimmedlen+sizeof(raxNode*);
  if (h->iskey && !h->isnull) nodesize += sizeof(void*);
  trimmed = rax_malloc(nodesize);
  }

  if (postfixlen) {
  nodesize = sizeof(raxNode)+postfixlen+
  sizeof(raxNode*);
  postfix = rax_malloc(nodesize);
  }

  /* OOM? Abort now that the tree is untouched. */
  if (splitnode == NULL ||
  (trimmedlen && trimmed == NULL) ||
  (postfixlen && postfix == NULL))
  {
  rax_free(splitnode);
  rax_free(trimmed);
  rax_free(postfix);
  errno = ENOMEM;
  return 0;
  }
  splitnode->data[0] = h->data[j];

  if (j == 0) {
  /* 3a: Replace the old node with the split node. */
  if (h->iskey) {
  void *ndata = raxGetData(h);
  raxSetData(splitnode,ndata);
  }
  memcpy(parentlink,&splitnode,sizeof(splitnode));
  } else {
  /* 3b: Trim the compressed node. */
  trimmed->size = j;
  memcpy(trimmed->data,h->data,j);
  trimmed->iscompr = j > 1 ? 1 : 0;
  trimmed->iskey = h->iskey;
  trimmed->isnull = h->isnull;
  if (h->iskey && !h->isnull) {
  void *ndata = raxGetData(h);
  raxSetData(trimmed,ndata);
  }
  raxNode **cp = raxNodeLastChildPtr(trimmed);
  memcpy(cp,&splitnode,sizeof(splitnode));
  memcpy(parentlink,&trimmed,sizeof(trimmed));
  parentlink = cp; /* Set parentlink to splitnode parent. */
  rax->numnodes++;
  }

  /* 4: Create the postfix node: what remains of the original
  * compressed node after the split. */
  if (postfixlen) {
  /* 4a: create a postfix node. */
  postfix->iskey = 0;
  postfix->isnull = 0;
  postfix->size = postfixlen;
  postfix->iscompr = postfixlen > 1;
  memcpy(postfix->data,h->data+j+1,postfixlen);
  raxNode **cp = raxNodeLastChildPtr(postfix);
  memcpy(cp,&next,sizeof(next));
  rax->numnodes++;
  } else {
  /* 4b: just use next as postfix node. */
  postfix = next;
  }

  /* 5: Set splitnode first child as the postfix node. */
  raxNode **splitchild = raxNodeLastChildPtr(splitnode);
  memcpy(splitchild,&postfix,sizeof(postfix));

  /* 6. Continue insertion: this will cause the splitnode to
  * get a new child (the non common character at the currently
  * inserted key). */
  rax_free(h);
  h = splitnode;
  } else if (h->iscompr && i == len) {
  /* ------------------------- ALGORITHM 2 --------------------------- */
  debugf("ALGO 2: Stopped at compressed node %.*s (%p) j = %d\n",
  h->size, h->data, (void*)h, j);

  /* Allocate postfix & trimmed nodes ASAP to fail for OOM gracefully. */
  size_t postfixlen = h->size - j;
  size_t nodesize = sizeof(raxNode)+postfixlen+sizeof(raxNode*);
  if (data != NULL) nodesize += sizeof(void*);
  raxNode *postfix = rax_malloc(nodesize);

  nodesize = sizeof(raxNode)+j+sizeof(raxNode*);
  if (h->iskey && !h->isnull) nodesize += sizeof(void*);
  raxNode *trimmed = rax_malloc(nodesize);

  if (postfix == NULL || trimmed == NULL) {
  rax_free(postfix);
  rax_free(trimmed);
  errno = ENOMEM;
  return 0;
  }

  /* 1: Save next pointer. */
  raxNode **childfield = raxNodeLastChildPtr(h);
  raxNode *next;
  memcpy(&next,childfield,sizeof(next));

  /* 2: Create the postfix node. */
  postfix->size = postfixlen;
  postfix->iscompr = postfixlen > 1;
  postfix->iskey = 1;
  postfix->isnull = 0;
  memcpy(postfix->data,h->data+j,postfixlen);
  raxSetData(postfix,data);
  raxNode **cp = raxNodeLastChildPtr(postfix);
  memcpy(cp,&next,sizeof(next));
  rax->numnodes++;

  /* 3: Trim the compressed node. */
  trimmed->size = j;
  trimmed->iscompr = j > 1;
  trimmed->iskey = 0;
  trimmed->isnull = 0;
  memcpy(trimmed->data,h->data,j);
  memcpy(parentlink,&trimmed,sizeof(trimmed));
  if (h->iskey) {
  void *aux = raxGetData(h);
  raxSetData(trimmed,aux);
  }

  /* Fix the trimmed node child pointer to point to
  * the postfix node. */
  cp = raxNodeLastChildPtr(trimmed);
  memcpy(cp,&postfix,sizeof(postfix));

  /* Finish! We don't need to contine with the insertion
  * algorithm for ALGO 2. The key is already inserted. */
  rax->numele++;
  rax_free(h);
  return 1; /* Key inserted. */
  }

  /* We walked the radix tree as far as we could, but still there are left
  * chars in our string. We need to insert the missing nodes.
  * Note: while loop never entered if the node was split by ALGO2,
  * since i == len. */
  while(i < len) {
  raxNode *child;

  /* If this node is going to have a single child, and there
  * are other characters, so that that would result in a chain
  * of single-childed nodes, turn it into a compressed node. */
  if (h->size == 0 && len-i > 1) {
  debugf("Inserting compressed node\n");
  size_t comprsize = len-i;
  if (comprsize > RAX_NODE_MAX_SIZE)
  comprsize = RAX_NODE_MAX_SIZE;
  raxNode *newh = raxCompressNode(h,s+i,comprsize,&child);
  if (newh == NULL) goto oom;
  h = newh;
  memcpy(parentlink,&h,sizeof(h));
  parentlink = raxNodeLastChildPtr(h);
  i += comprsize;
  } else {
  debugf("Inserting normal node\n");
  raxNode **new_parentlink;
  raxNode *newh = raxAddChild(h,s[i],&child,&new_parentlink);
  if (newh == NULL) goto oom;
  h = newh;
  memcpy(parentlink,&h,sizeof(h));
  parentlink = new_parentlink;
  i++;
  }
  rax->numnodes++;
  h = child;
  }
  raxNode *newh = raxReallocForData(h,data);
  if (newh == NULL) goto oom;
  h = newh;
  if (!h->iskey) rax->numele++;
  raxSetData(h,data);
  memcpy(parentlink,&h,sizeof(h));
  return 1; /* Element inserted. */

oom:
  /* This code path handles out of memory after part of the sub-tree was
  * already modified. Set the node as a key, and then remove it. However we
  * do that only if the node is a terminal node, otherwise if the OOM
  * happened reallocating a node in the middle, we don't need to free
  * anything. */
  if (h->size == 0) {
  h->isnull = 1;
  h->iskey = 1;
  rax->numele++; /* Compensate the next remove. */
  assert(raxRemove(rax,s,i,NULL) != 0);
  }
  errno = ENOMEM;
  return 0;
}
raxFind() 查找某个 key ,并返回对应的用户数据指针。如果没有找到,则返回 raxNotFound 。
/* Find a key in the rax, returns raxNotFound special void pointer value
 * if the item was not found, otherwise the value associated with the
 * item is returned. */
void *raxFind(rax *rax, unsigned char *s, size_t len) {
  raxNode *h;

  debugf("### Lookup: %.*s\n", (int)len, s);
  int splitpos = 0;
  size_t i = raxLowWalk(rax,s,len,&h,NULL,&splitpos,NULL);
  if (i != len || (h->iscompr && splitpos != 0) || !h->iskey)
  return raxNotFound;
  return raxGetData(h);
}
raxFindParentLink 返回父节点中指向子节点的指针的地址:
/* Return the memory address where the 'parent' node stores the specified
 * 'child' pointer, so that the caller can update the pointer with another
 * one if needed. The function assumes it will find a match, otherwise the
 * operation is an undefined behavior (it will continue scanning the
 * memory without any bound checking). */
raxNode **raxFindParentLink(raxNode *parent, raxNode *child) {
  raxNode **cp = raxNodeFirstChildPtr(parent);
  raxNode *c;
  while(1) {
  memcpy(&c,cp,sizeof(c));
  if (c == child) break;
  cp++;
  }
  return cp;
}
raxRemoveChild() 从一个节点中删除一个子节点。如果父节点时压缩节点,只需将父节点修改为没有子节点的普通空节点即可。否则就要查找要删除的子节点的位置,再将其删除。
/* Low level child removal from node. The new node pointer (after the child
 * removal) is returned. Note that this function does not fix the pointer
 * of the parent node in its parent, so this task is up to the caller.
 * The function never fails for out of memory. */
raxNode *raxRemoveChild(raxNode *parent, raxNode *child) {
  debugnode("raxRemoveChild before", parent);
  /* If parent is a compressed node (having a single child, as for definition
  * of the data structure), the removal of the child consists into turning
  * it into a normal node without children. */
  if (parent->iscompr) {
  void *data = NULL;
  if (parent->iskey) data = raxGetData(parent);
  parent->isnull = 0;
  parent->iscompr = 0;
  parent->size = 0;
  if (parent->iskey) raxSetData(parent,data);
  debugnode("raxRemoveChild after", parent);
  return parent;
  }

  /* Otherwise we need to scan for the children pointer and memmove()
  * accordingly.
  *
  * 1. To start we seek the first element in both the children
  *  pointers and edge bytes in the node. */
  raxNode **cp = raxNodeFirstChildPtr(parent);
  raxNode **c = cp;
  unsigned char *e = parent->data;

  /* 2. Search the child pointer to remove inside the array of children
  *  pointers. */
  while(1) {
  raxNode *aux;
  memcpy(&aux,c,sizeof(aux));
  if (aux == child) break;
  c++;
  e++;
  }

  /* 3. Remove the edge and the pointer by memmoving the remaining children
  *  pointer and edge bytes one position before. */
  int taillen = parent->size - (e - parent->data) - 1;
  debugf("raxRemoveChild tail len: %d\n", taillen);
  memmove(e,e+1,taillen);

  /* Since we have one data byte less, also child pointers start one byte
  * before now. */
  memmove(((char*)cp)-1,cp,(parent->size-taillen-1)*sizeof(raxNode**));

  /* Move the remaining "tail" pointer at the right position as well. */
  memmove(((char*)c)-1,c+1,taillen*sizeof(raxNode**)+parent->iskey*sizeof(void*));

  /* 4. Update size. */
  parent->size--;

  /* realloc the node according to the theoretical memory usage, to free
  * data if we are over-allocating right now. */
  raxNode *newnode = rax_realloc(parent,raxNodeCurrentLength(parent));
  if (newnode) {
  debugnode("raxRemoveChild after", newnode);
  }
  /* Note: if rax_realloc() fails we just return the old address, which
  * is valid. */
  return newnode ? newnode : parent;
}
raxRemove() 将一个元素删除,如果发现并删除则返回 1, 否则返回 0。这个操作可能需要合并节点。
首先同样需要 raxLowWalk() 找到一个代表要删除元素的节点,将其 iskey 字段置 0。
如果这个节点没有子节点,那么上溯祖先节点逐个删除直到遇到一个有两个以上子节点或者 iskey 为 1 的节点。
有两种情况需要用到压缩操作:
iskey 为 0 。不断上溯直到没有需要压缩的节点为止,创建新节点,存储从这个节点开始需要压缩的节点的数据。
/* Remove the specified item. Returns 1 if the item was found and
 * deleted, 0 otherwise. */
int raxRemove(rax *rax, unsigned char *s, size_t len, void **old) {
  raxNode *h;
  raxStack ts;

  debugf("### Delete: %.*s\n", (int)len, s);
  raxStackInit(&ts);
  int splitpos = 0;
  size_t i = raxLowWalk(rax,s,len,&h,NULL,&splitpos,&ts);
  if (i != len || (h->iscompr && splitpos != 0) || !h->iskey) {
  raxStackFree(&ts);
  return 0;
  }
  if (old) *old = raxGetData(h);
  h->iskey = 0;
  rax->numele--;

  /* If this node has no children, the deletion needs to reclaim the
  * no longer used nodes. This is an iterative process that needs to
  * walk the three upward, deleting all the nodes with just one child
  * that are not keys, until the head of the rax is reached or the first
  * node with more than one child is found. */

  int trycompress = 0; /* Will be set to 1 if we should try to optimize the
  tree resulting from the deletion. */

  if (h->size == 0) {
  debugf("Key deleted in node without children. Cleanup needed.\n");
  raxNode *child = NULL;
  while(h != rax->head) {
  child = h;
  debugf("Freeing child %p [%.*s] key:%d\n", (void*)child,
  (int)child->size, (char*)child->data, child->iskey);
  rax_free(child);
  rax->numnodes--;
  h = raxStackPop(&ts);
  /* If this node has more then one child, or actually holds
  * a key, stop here. */
  if (h->iskey || (!h->iscompr && h->size != 1)) break;
  }
  if (child) {
  debugf("Unlinking child %p from parent %p\n",
  (void*)child, (void*)h);
  raxNode *new = raxRemoveChild(h,child);
  if (new != h) {
  raxNode *parent = raxStackPeek(&ts);
  raxNode **parentlink;
  if (parent == NULL) {
  parentlink = &rax->head;
  } else {
  parentlink = raxFindParentLink(parent,h);
  }
  memcpy(parentlink,&new,sizeof(new));
  }

  /* If after the removal the node has just a single child
  * and is not a key, we need to try to compress it. */
  if (new->size == 1 && new->iskey == 0) {
  trycompress = 1;
  h = new;
  }
  }
  } else if (h->size == 1) {
  /* If the node had just one child, after the removal of the key
  * further compression with adjacent nodes is pontentially possible. */
  trycompress = 1;
  }

  /* Don't try node compression if our nodes pointers stack is not
  * complete because of OOM while executing raxLowWalk() */
  if (trycompress && ts.oom) trycompress = 0;

  if (trycompress) {
  debugf("After removing %.*s:\n", (int)len, s);
  debugnode("Compression may be needed",h);
  debugf("Seek start node\n");

  /* Try to reach the upper node that is compressible.
  * At the end of the loop 'h' will point to the first node we
  * can try to compress and 'parent' to its parent. */
  raxNode *parent;
  while(1) {
  parent = raxStackPop(&ts);
  if (!parent || parent->iskey ||
  (!parent->iscompr && parent->size != 1)) break;
  h = parent;
  debugnode("Going up to",h);
  }
  raxNode *start = h; /* Compression starting node. */

  /* Scan chain of nodes we can compress. */
  size_t comprsize = h->size;
  int nodes = 1;
  while(h->size != 0) {
  raxNode **cp = raxNodeLastChildPtr(h);
  memcpy(&h,cp,sizeof(h));
  if (h->iskey || (!h->iscompr && h->size != 1)) break;
  /* Stop here if going to the next node would result into
  * a compressed node larger than h->size can hold. */
  if (comprsize + h->size > RAX_NODE_MAX_SIZE) break;
  nodes++;
  comprsize += h->size;
  }
  if (nodes > 1) {
  /* If we can compress, create the new node and populate it. */
  size_t nodesize =
  sizeof(raxNode)+comprsize+sizeof(raxNode*);
  raxNode *new = rax_malloc(nodesize);
  /* An out of memory here just means we cannot optimize this
  * node, but the tree is left in a consistent state. */
  if (new == NULL) {
  raxStackFree(&ts);
  return 1;
  }
  new->iskey = 0;
  new->isnull = 0;
  new->iscompr = 1;
  new->size = comprsize;
  rax->numnodes++;

  /* Scan again, this time to populate the new node content and
  * to fix the new node child pointer. At the same time we free
  * all the nodes that we'll no longer use. */
  comprsize = 0;
  h = start;
  while(h->size != 0) {
  memcpy(new->data+comprsize,h->data,h->size);
  comprsize += h->size;
  raxNode **cp = raxNodeLastChildPtr(h);
  raxNode *tofree = h;
  memcpy(&h,cp,sizeof(h));
  rax_free(tofree); rax->numnodes--;
  if (h->iskey || (!h->iscompr && h->size != 1)) break;
  }
  debugnode("New node",new);

  /* Now 'h' points to the first node that we still need to use,
  * so our new node child pointer will point to it. */
  raxNode **cp = raxNodeLastChildPtr(new);
  memcpy(cp,&h,sizeof(h));

  /* Fix parent link. */
  if (parent) {
  raxNode **parentlink = raxFindParentLink(parent,start);
  memcpy(parentlink,&new,sizeof(new));
  } else {
  rax->head = new;
  }

  debugf("Compressed %d nodes, %d total bytes\n",
  nodes, (int)comprsize);
  }
  }
  raxStackFree(&ts);
  return 1;
}
压缩线性结构用作传输或存储非常方便,它是其实是一个线性结构得编码方式。下面是一个压缩线性结构得样子:
<zlbytes> <zltail> <zllen> <entry> <entry> ... <entry> <zlend>
如果没有特别说明,每个字段都用小端序存储。
<int32_t zlbytes> 表示压缩链表一共占用多少字节的空间。<uint32_t zltail> 是最后一个 entry 的偏移量。<uint16_t zllen> 是 entry 的数量,乳沟有数量超过 \(2^{16}-2\) 个
entry ,这个值为 \(2^{16}-1\) ,需要遍历整个表才能数出有多少个 entry。<uint8_t zlend> 在压缩链表的结尾,表示链表的结束位置,这个值总是 255。这需要一个限制:没有任何一个 entry 的第一个字节是 255 。entry 看起来是这个样子的:
<prevlen> <encoding> <entry-data>
有时候 encoding 同时表示编码类型和数值,这种情况下时没有 entry-data 的。
prevlen 的编码是可变长度的。如果长度少于 255,那么用一个字节表示 prevlen,否则第一个字节为 255,后面紧接着的 4 个字节表示真正的长度。所以 entry 的结构有两种情况:
// 长度小于 255
<prevlen from 0 to 254> <encoding> <entry>
// 其他情况
0xFF <4 bytes unsigned little endian prevlen> <encoding> <entry>
encoding 字段的编码方式取决于 entry-data 的类型和长度。
如果没有特别说民个,所有的整数都是小端序的。整个结构就是这样,代码并没有什么难度。
zipmap 是压缩的映射结构,可以表示 string 到 string 的映射。这其实是个编码协议。下面是一个表示 "foo" => "bar", "hello" => "world" 的映射结构:
<zmlen><len>"foo"<len><free>"bar"<len>"hello"<len><free>"world"
<uint8_t zmlen> 表示映射的数量,如果超过 254,这个值是没有用的,只能遍历整个结构数出映射数量。<len> 表示紧跟着的字符串的长度,如果第一个字节属于 [0,253] ,只有一个字节,否则,第一个字节是 254,后面紧跟着 4 个字节表示长度。 255 表示结构的结束。<free> 是字符串后面空闲位置的长度, value 修改时经常会伴随着长度的改变。这个值总是 8 比特的。上述结构真实存储为:
"\x02\x03foo\x03\x00bar\x05hello\x05\x00world\xff"
代码并没有什么难度
server.h 是 redis 种最核心的头文件,所有的服务端配置以及共享状态都保存在结构
struct redisServer 中,比较核心的字段有
server.db 是一个数组,这是数据存储的地方。server.commands 是一个命令表,规定收到哪些命令需要执行哪些函数。server.clients 是一个链表,保存连接的客户端。server.master 是个特殊客户端,用于连接集群中的 master 节点。
redisServer 结构中有一个 redisDb 数组,这就是最终存储数据的地方。数组中一个 redisDb 结构就是一个库。 dict 记录的就是 redis 的 key 与对应的
value, expires 记录的是 key 对应的超时时间,每次操作时都会访问这个字段,查看 key 是否超时。
typedef struct redisDb {
  dict *dict;  /* The keyspace for this DB */
  dict *expires;  /* Timeout of keys with a timeout set */
  dict *blocking_keys;  /* Keys with clients waiting for data (BLPOP)*/
  dict *ready_keys;  /* Blocked keys that received a PUSH */
  dict *watched_keys;  /* WATCHED keys for MULTI/EXEC CAS */
  int id;  /* Database ID */
  long long avg_ttl;  /* Average TTL, just for stats */
} redisDb;
库中各种数据结构都存储为 robj 结构,可以表示字符串,链表,集合等结构。
type 表明了真正的类型, ptr 指向真正的结构。
db.c 定义了数据库操作的代码。 lookupKey() 查找 key 对应的结构, flags
表示是否改变 key 的最近访问时间。
/* Low level key lookup API, not actually called directly from commands
 * implementations that should instead rely on lookupKeyRead(),
 * lookupKeyWrite() and lookupKeyReadWithFlags(). */
robj *lookupKey(redisDb *db, robj *key, int flags) {
  dictEntry *de = dictFind(db->dict,key->ptr);
  if (de) {
  robj *val = dictGetVal(de);

  /* Update the access time for the ageing algorithm.
  * Don't do it if we have a saving child, as this will trigger
  * a copy on write madness. */
  if (server.rdb_child_pid == -1 &&
  server.aof_child_pid == -1 &&
  !(flags & LOOKUP_NOTOUCH))
  {
  if (server.maxmemory_policy & MAXMEMORY_FLAG_LFU) {
  unsigned long ldt = val->lru >> 8;
  unsigned long counter = LFULogIncr(val->lru & 255);
  val->lru = (ldt << 8) | counter;
  } else {
  val->lru = LRU_CLOCK();
  }
  }
  return val;
  } else {
  return NULL;
  }
}
lookupKeyReadWithFlags() 不光查找 key,还承担了将 key 超时的任务。
slave 不会将 key 超时,这是 master 的任务,slave 只是返回一个超时状态。
/* Lookup a key for read operations, or return NULL if the key is not found
 * in the specified DB.
 *
 * As a side effect of calling this function:
 * 1. A key gets expired if it reached it's TTL.
 * 2. The key last access time is updated.
 * 3. The global keys hits/misses stats are updated (reported in INFO).
 *
 * This API should not be used when we write to the key after obtaining
 * the object linked to the key, but only for read only operations.
 *
 * Flags change the behavior of this command:
 *
 *  LOOKUP_NONE (or zero): no special flags are passed.
 *  LOOKUP_NOTOUCH: don't alter the last access time of the key.
 *
 * Note: this function also returns NULL is the key is logically expired
 * but still existing, in case this is a slave, since this API is called only
 * for read operations. Even if the key expiry is master-driven, we can
 * correctly report a key is expired on slaves even if the master is lagging
 * expiring our key via DELs in the replication link. */
robj *lookupKeyReadWithFlags(redisDb *db, robj *key, int flags) {
  robj *val;

  if (expireIfNeeded(db,key) == 1) {
  /* Key expired. If we are in the context of a master, expireIfNeeded()
  * returns 0 only when the key does not exist at all, so it's safe
  * to return NULL ASAP. */
  if (server.masterhost == NULL) return NULL;

  /* However if we are in the context of a slave, expireIfNeeded() will
  * not really try to expire the key, it only returns information
  * about the "logical" status of the key: key expiring is up to the
  * master in order to have a consistent view of master's data set.
  *
  * However, if the command caller is not the master, and as additional
  * safety measure, the command invoked is a read-only command, we can
  * safely return NULL here, and provide a more consistent behavior
  * to clients accessign expired values in a read-only fashion, that
  * will say the key as non exisitng.
  *
  * Notably this covers GETs when slaves are used to scale reads. */
  if (server.current_client &&
  server.current_client != server.master &&
  server.current_client->cmd &&
  server.current_client->cmd->flags & CMD_READONLY)
  {
  return NULL;
  }
  }
  val = lookupKey(db,key,flags);
  if (val == NULL)
  server.stat_keyspace_misses++;
  else
  server.stat_keyspace_hits++;
  return val;
}
几乎所有的查找操作都使用了这个函数。
要向库添加一个 key,就要向 dict 中添加,并通知集群。
这个结构定义了命令到操作的映射。 例如, “get” 命令:
{"get",getCommand,2,"rF",0,NULL,1,1,1,0,0}
如果遇到 get 命令,则调用 getCommand() 函数,这个命令包含两个参数,
"rF" 说明这是个只读的任务,而且应该立即执行而不是推迟。 getCommand()
调用 getGenericCommand() ,由 t_string 定义。这个函数将查找这个 key,并将值返回,但如果这个值不是 string,那么它没有 get 命令,所以将返回错误 shared.wrongtypeerr 。
client 结构用于与客户端交互, fd 是 socket 的文件描述符; argc 和 argv
是客户端发来的命令和参数; querybuf 是客户端发送来的请求,还没有解析;
reply 和 buf 是要返回给客户端的数据。
struct client {
  int fd;
  sds querybuf;
  int argc;
  robj **argv;
  redisDb *db;
  int flags;
  list *reply;
  char buf[PROTO_REPLY_CHUNK_BYTES];
  ... many other fields ...
}
程序加载后进入 main() 函数。假设在 linux 环境启动,通常需要初始化需要的库,设置程序名,环境变量等。进入 spt_init() 函数进行这些设置。
接着调用 setlocale() 设置字符串环境,因为第二个参数为空字符串,所以根据环境变零设置语言环境。
再使用 zmalloc_set_oom_handler() 设定如果 malloc() 失败,超出最大内存限制应该如何处理,这里设置为 redisOutOfMemoryHandler ,也就是打印一个错误信息后退出程序。
redis 执行过程中使用到随机数,在这里设置随机数种子为事件和进程号的异或。
接下来获得当前日期和时间,但之后并没有用到这个变量。
接着使用一个随机 16 进制字符串初始化字典哈希函数的初始参数。
接着判断这个进程是不是 sentinel 模式,这个判断只能通过命令行参数进行,如果程序名称为 "redis-sentinel" 或者参数中包含 --sentinel 就是
sentinel 模式。 sentinel 模式是一个高可用的模式,如果发现 master 宕机后会自动切换。sentinel 模式用于监控是否有节点异常,并承担切换 master
的任务。
接着用 initServerConfig() 设置服务端配置 (server 结构) 的默认值,
server 是个 struct redisServer server 结构的全局变量。命令表在这里被读取到名为 server.commands 的 dict 中,一些常用的命令被预先保存再 server
结构里,当常用命令被调用时,不再查询 server.commands 而是直接调用。
接着调用 moduleInitModulesSystem() 初始化模块系统,我想永远不会有人会用到它的。
接着设置 server.executable 为程序的绝对路径,将运行参数复制到
server.exec_argv 中。
如果是 sentinel 模式,则初始化相关配置。sentinel 模式的程序不能接收普通 redis 程序可以接收的命令,只能接收 SENTINEL 命令。所以这里的初始化将修改将 server.commands 表。
接着选择打开 rdb 模式或 aof 模式。这是两种持久化模式,只能选择其一。 rdb 模式是将数据编码后直接保存到文件中, aof 模式是将操作日志保存在文件中。
接下来解析命令行参数。先处理 “–help” 和 “–version” 的情况。如果有配置文件,就在第一个参数处指定。所有参数和配置文件中的最终都会被插入到
options 字符串中,再通过 loadServerConfigFromString() 写入到 server 结构里。
进程将在这里打印日志,表示 redis 以何种方式启动,redis 版本等信息。
接着确保 redis 是 daemon 进程启动的,之后使用 initServer() 初始化
server 。
在 initServer() 中,先设置信号接收函数,以便在需要停止服务时优雅终止。这里也创建 server 中需要的数据结构,因为马上就要用到。这里也设置要最多能打开的文件数量。创建事件循环和数据库数据结构,监听端口。事件循环中注册一个定时事件,每 1 毫秒调用以此 serverCron 。同时将打开的监听端口
socket 注册到事件循环里,如果有新的连接请求则调用 acceptTcpHandler 。这里还注册了一个 pip 的事件,用来临时唤醒事件循环。如果需要,则打开
aof 文件。
之后初始化其它组件,如集群,bio,脚本等。
在 serverCron 中执行一些定时任务,比如收集超时的 key ,更新数据,调整哈希表,启动 BGSAVE/AOF 重写等。几乎所需要周期执行的任务都在这个函数里。
initServer() 执行结束后,设置一些进程相关的配置。接着,设置事件循环唤醒前后调用的函数,并启动事件循环。
redis 至此启动完成。
如果收到一个连接请求,事件循环唤醒 acceptTcpHandler() 。这个函数接受连接请求,并进入 acceptCommandHandler() 。
因为是新的连接,所以在 acceptCommandHandler() 里根据文件描述符创建
client。默认这个 client 使用 db0 。创建时,将这个 client 的 socket 描述符注册到事件循环里,当文件描述符可写,则调用 readQueryFromClient 。
在 readQueryFromCLient() 中,读取并解析请求,最终执行请求。选择执行哪个命令的函数是 processCommand() 。函数先处理各种异常情况,最后执行这个命令。最后调用 call() 函数执行选出的命令 c->cmd->proc(c) 。命令函数会将返回的结果写到 client 里。在 beforeSleep() 函数中,如果有回复需要写到网络中,则调用 handleClientsWithPendingWrites() 将结果发送到客户端。
By Liao Tonglang.
把当前热点继续串成多页阅读,而不是停在单篇消费。
LevelDB 缓存实现解析:LRU 算法在 Key-Value 数据库中的应用与优化
LevelDB 使用指南:Google 开发的高性能 Key-Value 数据库实践教程
从 OLTP/OLAP/HTAP 边界、嵌入式 DuckDB 与分布式 Trino/Spark 分工、批式扫描与交互式查询延迟口径出发,闭合 lakehouse 与 stream-processing 之间的查询层缺口,并给出本系列 18 篇地图。
从 Parser/AST、Analyzer 与 Catalog 元数据到 LogicalPlan 算子树;对照 PostgreSQL parse/rewrite/plan 边界,并用 DuckDB 1.5.4 实测 EXPLAIN 与 Trino 476+ 文档中的 logical plan 结构对读。